Excel formulas explained with pears and apples

An essential aspect when learning to use Excel is knowing how the formulas and functions of this wonderful tool operate. In this article we leave you step by step and everything you need to know to correctly apply your first formulas in Excel.
1. The basics of Excel formulas:
- Excel formulas: they are expressions that we enter inside a cell. Each of these expressions will give us a result, which will be shown in the cell where we write the formula.
- Excel functions: These are specific formulas that Excel already has built-in. Each function has its name and specific structure. To use these functions we must properly introduce the arguments that the different functions ask of us.
You can watch this video to clarify what a formula is:
In this video you can also learn more about what a function is:
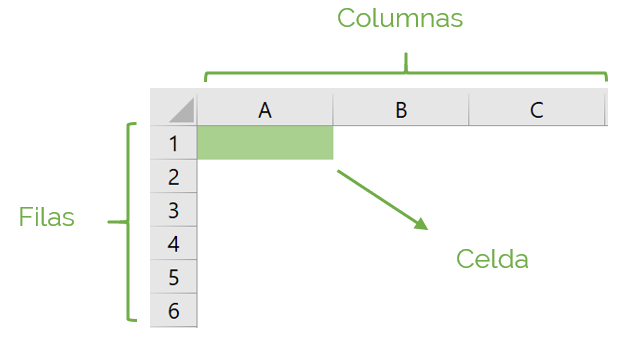
Excel is structured in the following way to make its operation user-friendly:
- Cell: space where data, text, formulas or functions are entered.
- Columns: groupings of vertical cells. Excel identifies each column with a letter.
- Rows: groupings of horizontal cells. Excel identifies each row with a number.
2. Components of Excel formulas:
To correctly use a formula in Excel, we must learn what the components of a formula are.
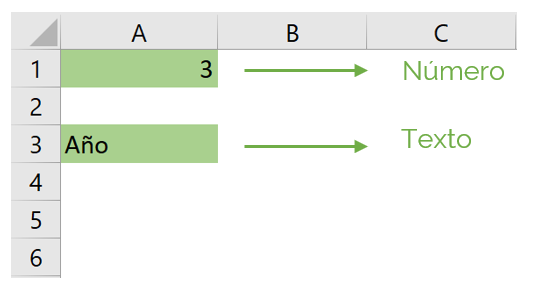
Excel formula constants or text
It is the information that we enter in the cell, whether text or number. Excel places the numbers on the right side, and the text on the left side of the cell.
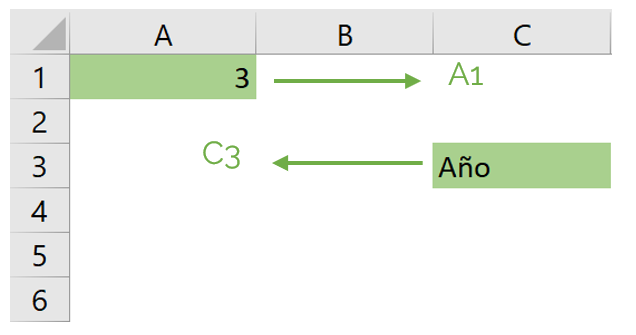
Excel formula cell references
It is the code that Excel has to name each of the cells. Each cell will have an associated column (top letters) and a row (bottom numbers). This way we will be able to use cell references to perform calculations and incorporate them into our Excel formulas and functions. As we see in the image, the cell reference of number 3 is A1 because it is in column “A”, and in row number 1. Likewise, “Year” is in column “C” and in row number 3 , and therefore, its cell reference is C3.
Excel formula operators
They are the signs that we use for the different formulas in a cell. They are mathematical operations, such as addition (+), subtraction (-), multiplication (*), and division (/).
Excel formula bar
It is the space where the value or formula of a cell is displayed. In this place we can edit the Excel formulas or values we want.
3. Insert Excel formulas
Inserting Excel formulas helps us perform different calculations in a simple way, where Excel simplifies the calculations and gives us a result quickly without needing a calculator. How do we do it? We click on the cell where we want to insert the Excel formula, and we put an equal sign so that Excel identifies that it is a formula.
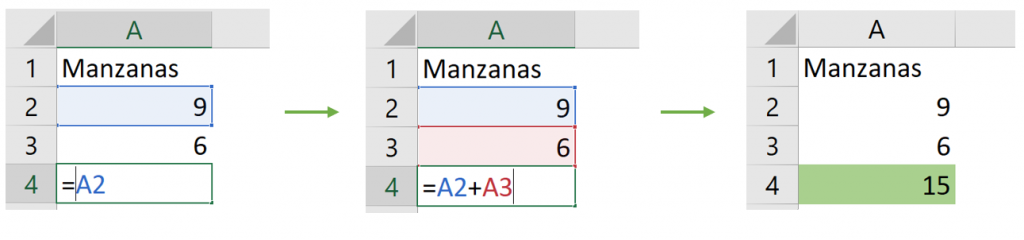
Then, we can make two types of formulas: with numbers directly, or with cell references. Let's imagine the following example, where we have to add the number of apples that are in 2 different places. In one place there are 9 apples and in the other place there are 6 apples. How do we add them?
1. Excel formulas only with numbers: simply after entering the equal sign, we put 9+6, press “Enter”, and Excel automatically gives us the result we want: 15 apples in total.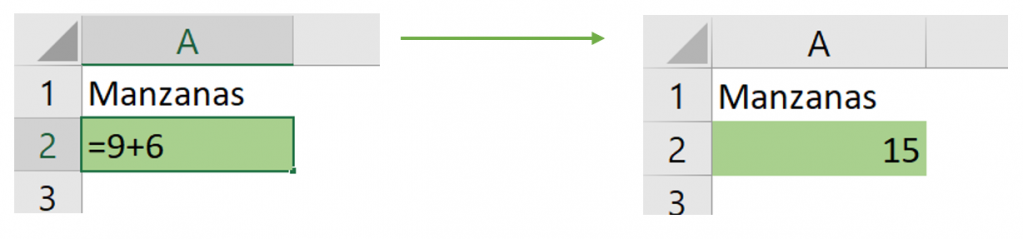
2. Excel Formulas with Cell References: Now each number is in a different cell, and we can use its cell references to perform the operation we want. As? We put an equal sign, we select the cell where the number 9 is (A2), then we use the plus sign (+), we select the cell where the number 6 is (A3) and finally we press “Enter”. Thus, Excel gives us the desired result as we see in the image. In addition, Excel associates a color for each cell reference, which makes it easier for us to visualize it to create Excel formulas.
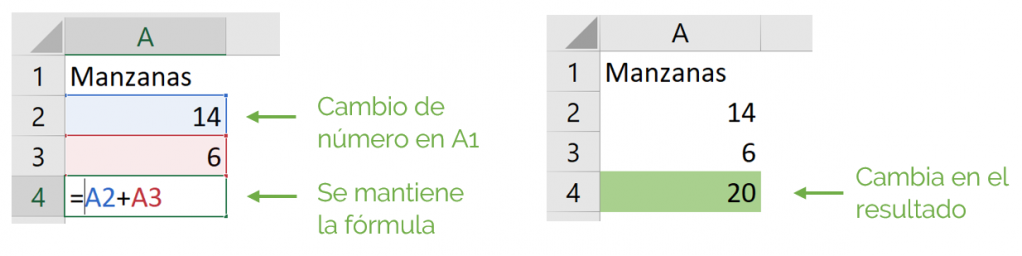
What is the idea of this? Being based on the cells, and not the numbers, we can change the value of the cells, and the result will change too! In our example, if in A2 instead of putting a 9, we put a 14, the value of our result automatically changes and we are left with the value of 20 instead of 15, as we see in the image below! And the formula is still the same! It's still A2 + A3.
4. Edit Excel formulas
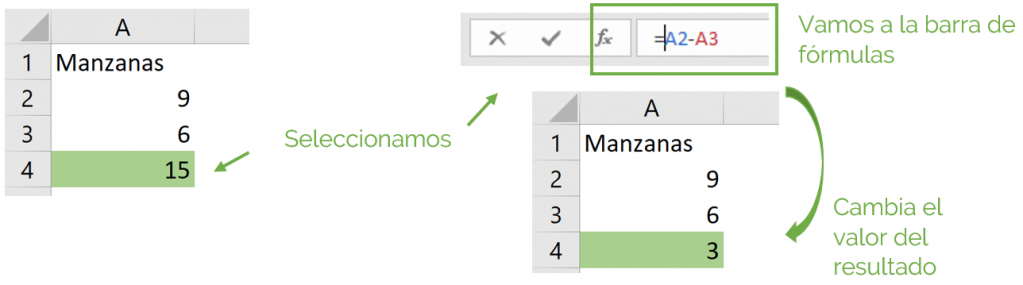
Editing Excel formulas allows us to change the formulas without having to write them again from scratch. In our previous example, we now want to see the difference in apples between the two parts. How do we do it? We click on the cell of the formula that we want to change, we go to the formula bar, we change from a plus (+) to a minus (-), we press “Enter”, and it changes the result from a 15 to a 3 as we see in the image.
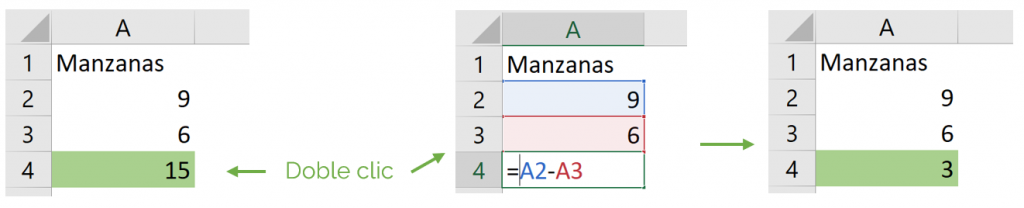
 We can also change the operation directly in the cell and not in the formula bar. As? We double click on the cell where we want to change the operation, change the operation, and press “Enter”, as shown below.
We can apply any operation we want to our Excel formulas!
5. Order of Excel formulas
Excel has a certain order to solve Excel formulas. First solve multiplication and division from left to right, and then add and subtract. If we want to alter this order we must specify it to Excel and put in parentheses the operations that we want it to perform first.
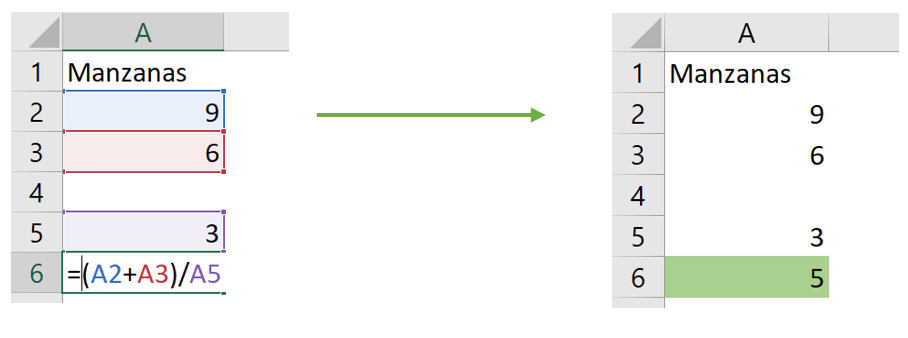
In our example, we are now going to imagine that we want to divide the sum of the apples into a number of people, 3.
- Without parentheses: If we do it without parentheses, Excel will first solve the division of 6 into 4 (A3/A5), and then it will add the 9 (A2), giving us 11 as a result.

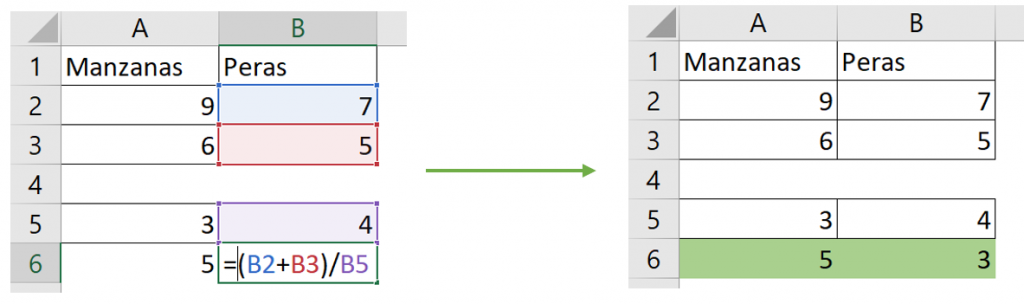
- With parentheses: since we want Excel to perform the addition first, we must indicate it with a parenthesis in the addition of 9 (A2) and 6 (A3). We apply the parentheses as shown in the image, and we are left with the result we wanted; 5 apples for each person.
6. Replicate Excel formulas
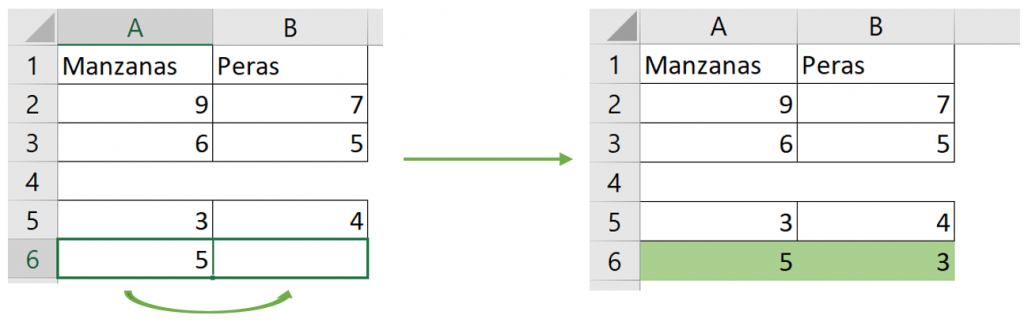
How do we do it if we want to replicate Excel formulas? That is, we want to perform the same operations for another cell set, but without writing the entire formula again. We have two ways to do this in Excel: (1) Copy and paste Excel formulas, and (2) drag Excel formulas.
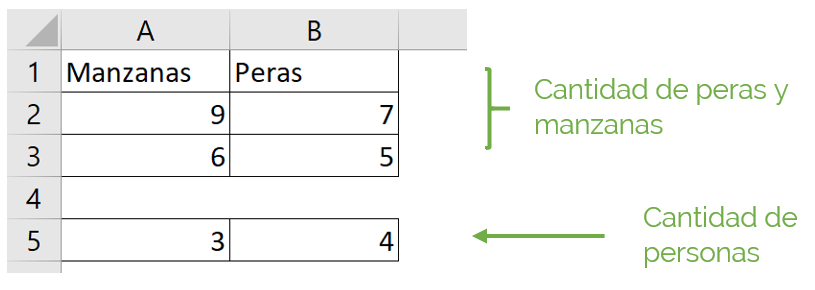
Let's continue with our example, but now we'll have pears too. We are going to obtain 7 pears from one part and 5 from another. We want to distribute them among 4 people. To facilitate it we will create a table, as shown in the image.
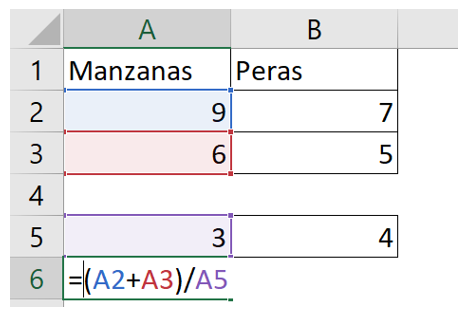
We apply the same previous formula, where we add the number of apples and divide them by the number of people, as the image shows.
Now we want to replicate this same formula for pears, without having to rewrite it, how do we do it?
1. Copy and paste Excel formulas
We go to the cell where our formula is in the apples (A6), we right click, and press “Copy”. Then we go to the cell where we want to insert the formula in the pears (B6) and we put “Paste”.
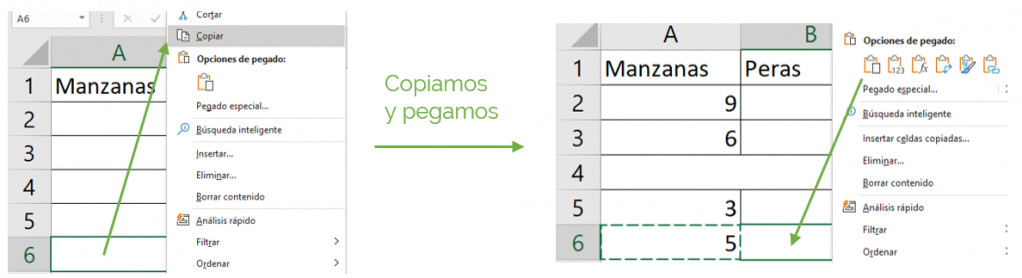
We see that it replicates exactly the same formula for column B! We obtain that there are 3 pears for each person.
2. Drag Excel formulas
We select the formula cell we want to copy from the apples, then click on the bottom point to the right of the cell and drag to the pears (up to B6) as shown in the image. And it's exactly the same, but faster!
7. Insert a function as Excel formulas
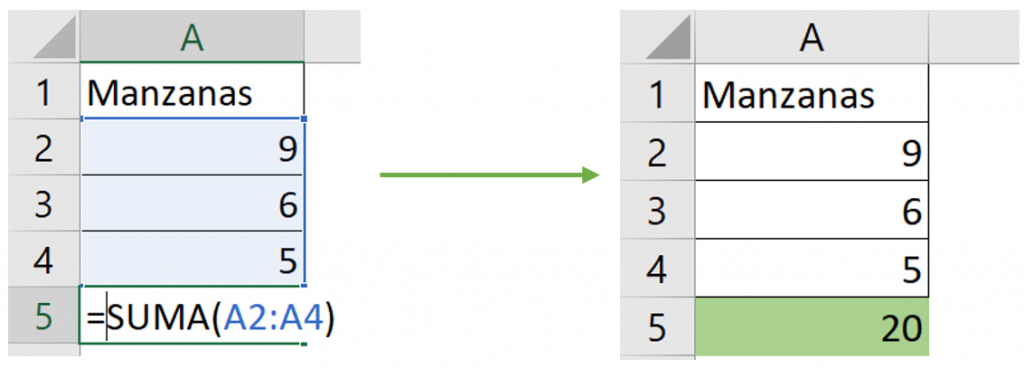
Inside the cells we can insert different functions that Excel already has built-in. In our example we can use the SUM function to add all the apples that we collect from the different parts. Let's imagine now that we collect apples from three parts, and we apply the SUM function. The structure of this function consists of putting the cell where the addition begins as the first argument, and as the last argument, the cell where the addition ends. As we see in the image, we drag from A2 to A4, since we want it to add 9, 6 and 5, giving us 20 as a result.
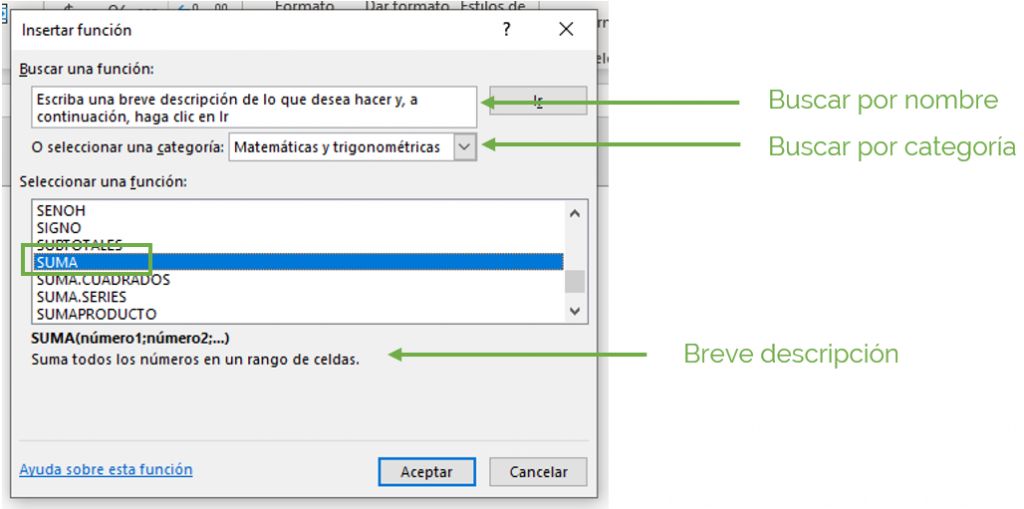
There are multiple Excel functions and each one has its own structure. How can we know which functions there are and what structure they occupy? We select any cell and select the “Insert a function” symbol, as the image shows.

This takes us to the next box, where we can search for functions by name or by category. In the case of the SUM function, we searched for the “Mathematics and trigonometric” category, and we found the function we were looking for. In addition, we see a brief description of it.
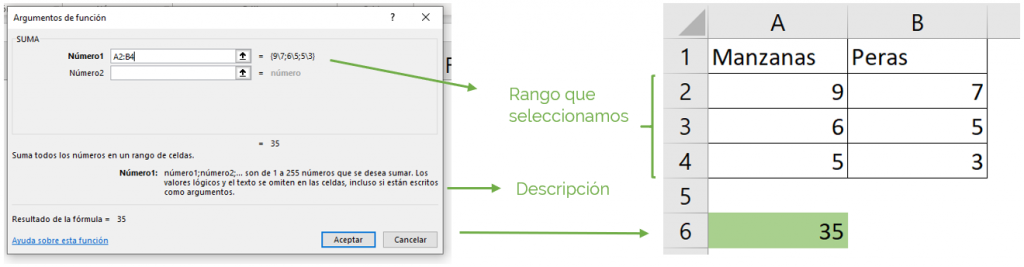
We select SUM, press “Accept”, and the following box appears, where Excel explains how the function works and what arguments we should enter. In our example, if we want to add the total number of pears and apples there are, we select the entire box with the quantities of pears and apples, that is, from A2 to B4. And so we are left with the total sum being 35.
Thus, once we know what this function is like, we can implement it directly in the cell we want. To do this we must ALWAYS insert an equal sign, then the function (SUM in this case), open parentheses, the arguments requested by the function, close the parenthesis and finally “Enter”.
Excel has multiple functions and many categories. There are Excel mathematical functions, date and time, text, logical, reference, statistics and many others!, which are used for different reasons. Some of the most typical functions are:
- SUM function
- COUNT function
- VLOOKUP function
- IF function
8. Common Excel Formula Errors
- Do not put the equal sign when inserting an Excel function or formula: this is very necessary, since, if we do not do it, Excel will not be able to recognize the formula or function and therefore, it will not be able to make calculations or deliver results.
- Forget parentheses in Excel functions or formulas: Each function must begin and end with a parenthesis so Excel can identify the arguments for the corresponding calculation.
- Incorrect argument in Excel functions or formulas: many times we put an argument wrong in a formula or function. To do this, we must pay close attention to the arguments that we are introducing in a formula and in a function to use them correctly.
Ninja Tip: If you want to learn more about Excel functions and formulas, we recommend visiting the following post.
