LOOPS in VBA: know how they work and when to use them

Key information
A common tool to make macros in VBA of Excel is the use of LOOPS. They are also known in Spanish as “loops”. With loops you can repeat a code the number of times you determine so as not to have to write it every time for each case.
The basics of Visual Basic (VBA)
Purpose: Visual Basic for Applications (VBA) is the programming language for macros in Excel. This way you can create and modify macros to do what you want.
Advantages: Using VBA you have greater flexibility and can make more applications than using the macro recorder.
Structure:
Sub Macro_Name()

Content

End Sub
- In Visual Basic (VBA), to create macros you must start with “Sub Macro_Name()” and end with “End Sub”.
- The word “Sub” means “subroutine”. The content of the subroutine is what you must program.
- Comments are written with a single quote before them. They are generally used to explain what is being done in case someone else works with this code. When the code is executed, Excel VBA ignores the comments. For example:
Sub Macro_Name()

'This is a comment

Content

End Sub
Before you start with Visual Basic (VBA)
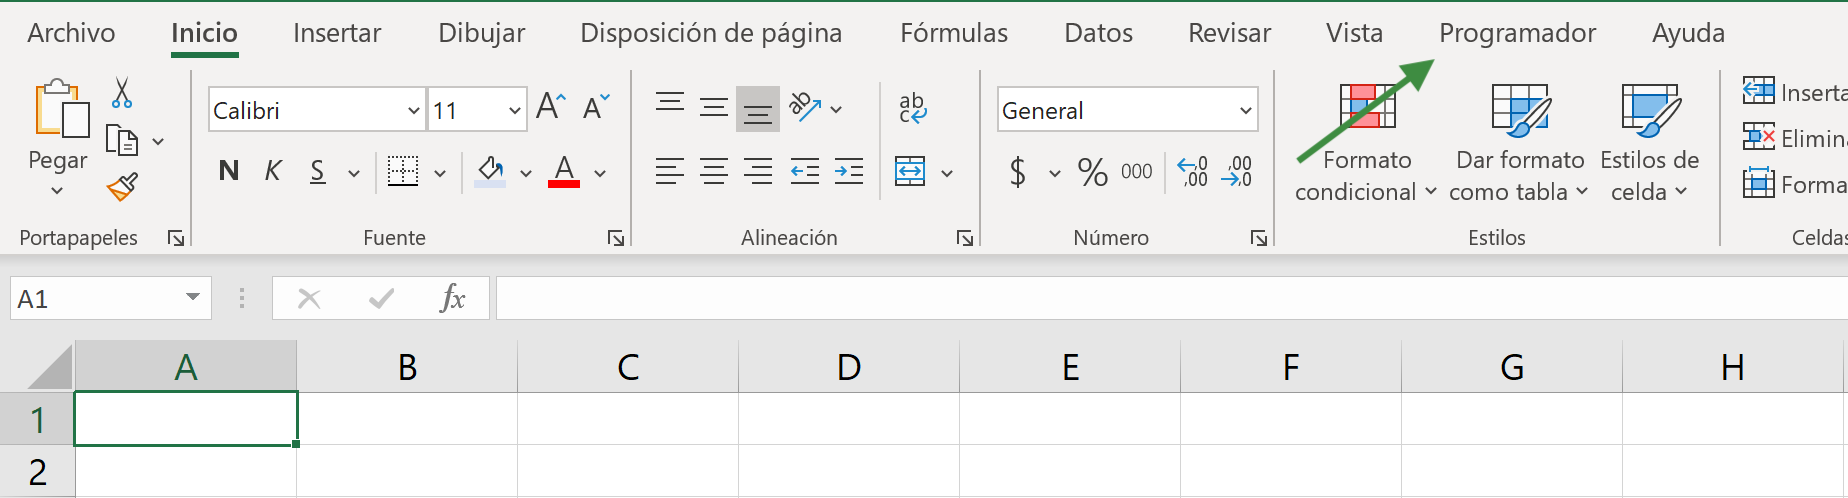
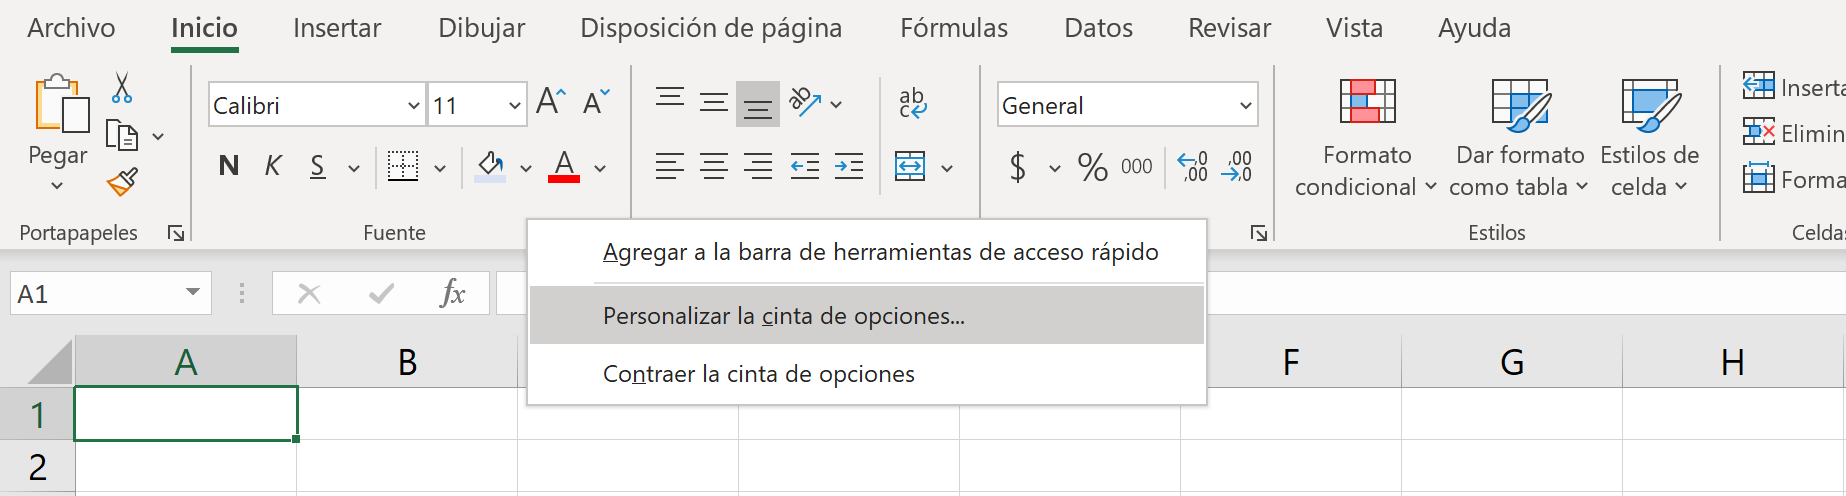
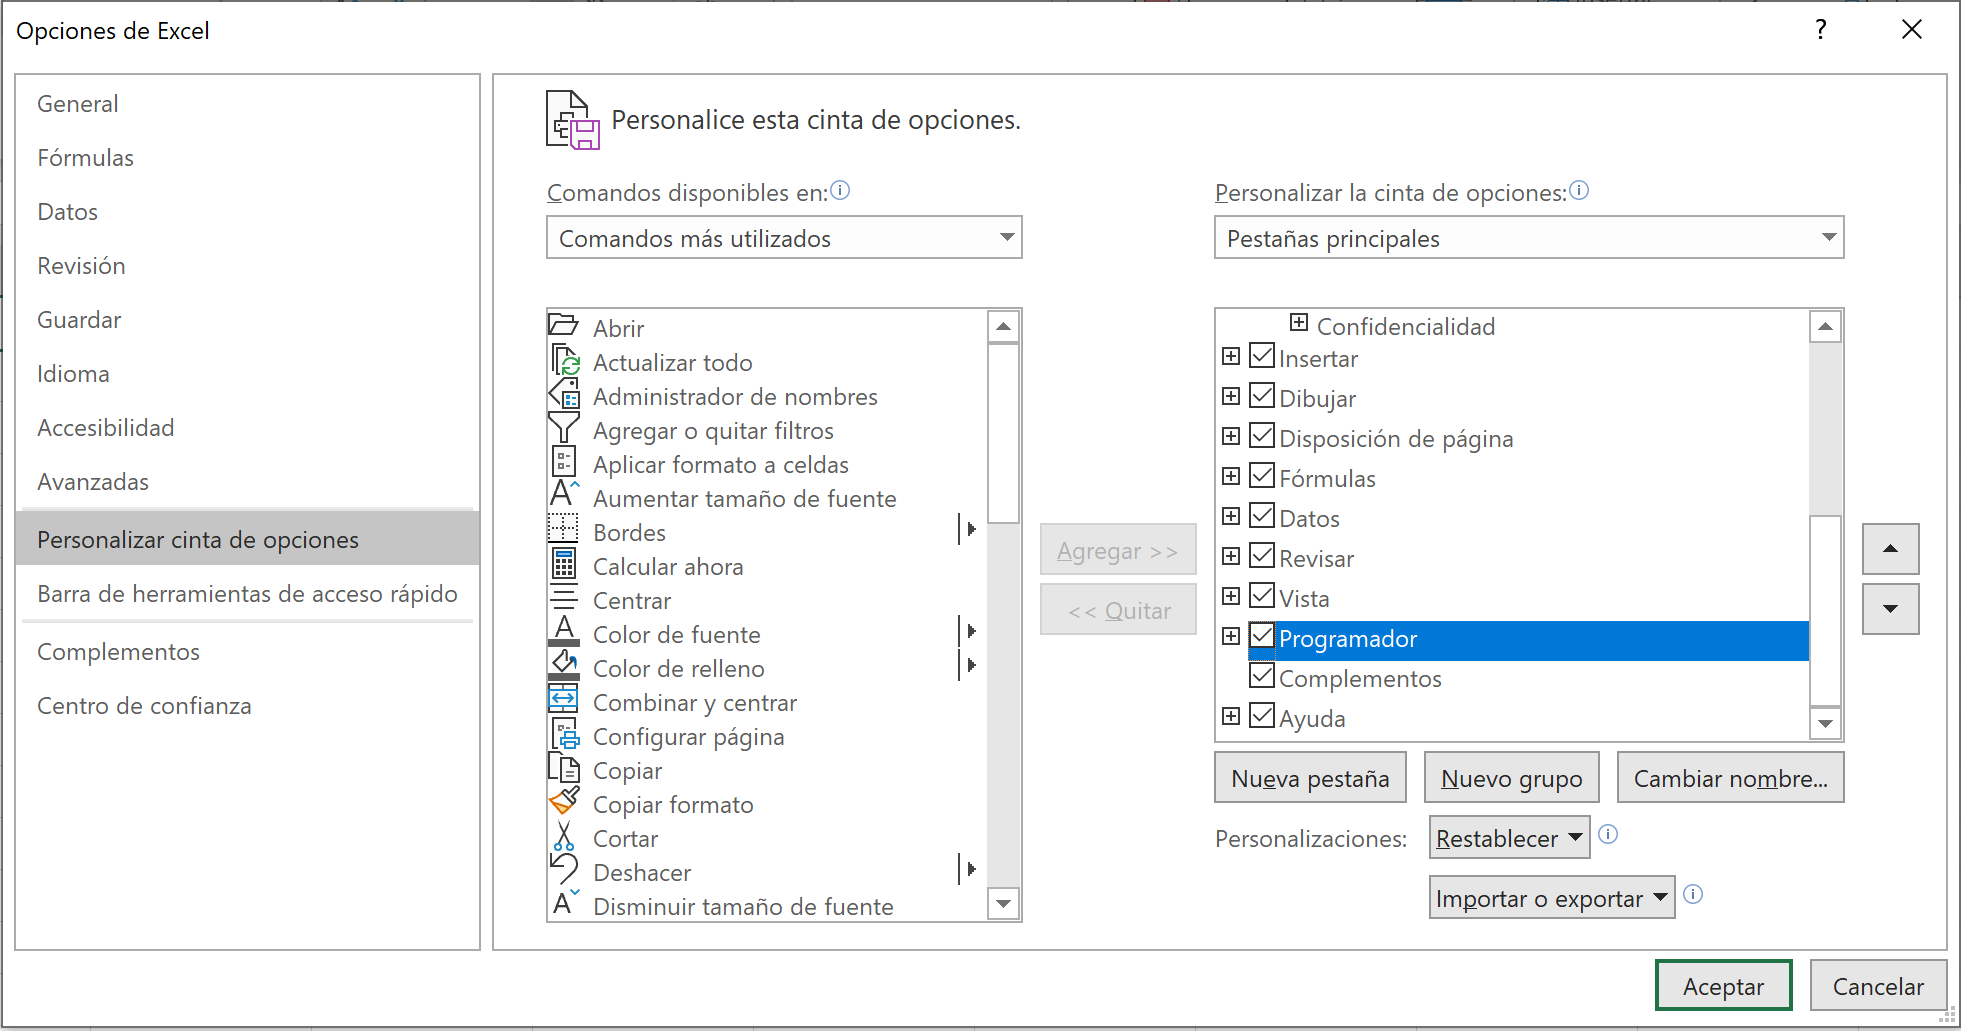
Before creating the macro, you must have the “Programmer” tab visible in Excel.
If you have Windows follow these steps:
- Right-click anywhere on the ribbon and click “Customize the Ribbon.”
- When the options box opens, in the box on the right, click on the “Programmer” square
- Click “Accept”.
- You will find the “Developer” tab next to the “View” tab.
If you have a Mac, follow the following steps:
- Click on “Excel” (top left)
- Click on “Preferences”
- Select the “Toolbar and Ribbon” section
- When the options box opens, in the box on the right, click on the “Programmer” square
- Click “Save”.
- You will find the “Developer” tab next to the “View” tab.
How to create a macro with Visual Basic (VBA)
- Click on “Visual Basic”, within the “Programmer” Tab.
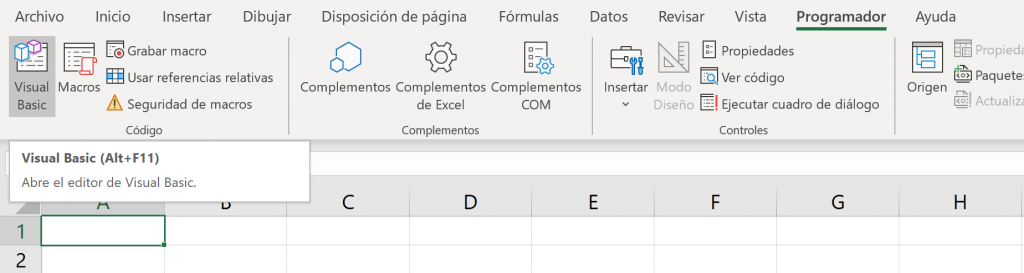
Ninja Tip: For Windows you can press Alt+F11 to open the Visual Basic editor. For Mac you can press Fn+Alt+F11
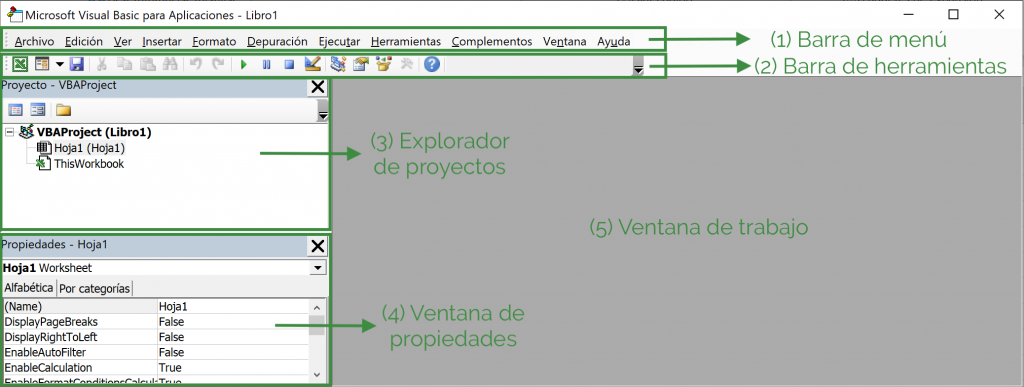
- The following window opens. This window is the Visual Basic (VBA) editor for Excel. It consists of 5 parts:
- Menu bar: has the options: “File”, “Edit”, “View”, etc.
- Toolbar: has the options “Save”, “Copy”, “Paste”, “Run macro” (the green “play” triangle).
- Project Explorer: allows you to see the active Excel Workbooks, their number of sheets and modules.
- Properties window: displays the properties of the selected project.
- Work window: area where the modules are opened: window where the macros are programmed.
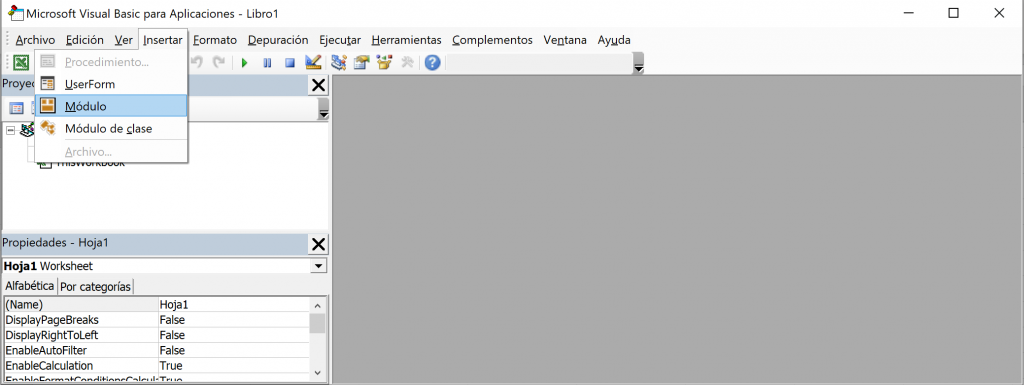
- In general, to write macros you use “Modules”. To do this, in the Menu Bar click on “Insert” and then click on “Module”.
- Now, Module 1 appears in the Project Explorer. In this module you can write your macros.
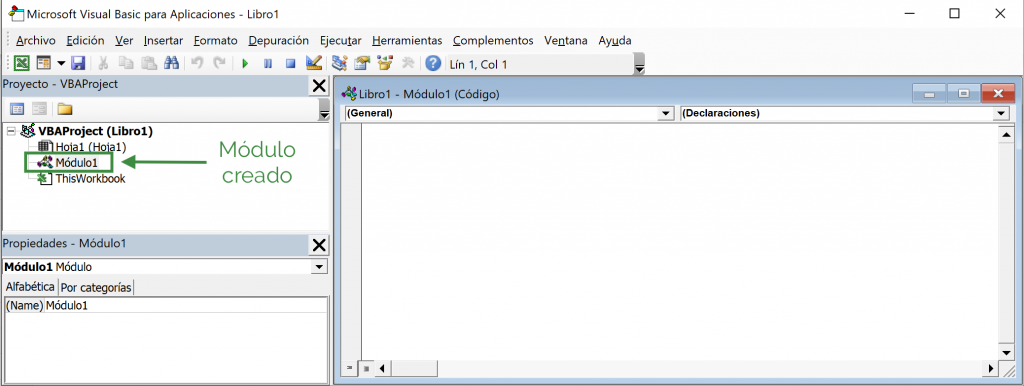
Ninja Tip: You can make your macros in different modules and there will be no problem, it is an order decision that depends on each one.
- In the Work Window write the following:
Sub First_Macro()
Range(“A1”).Value = “Hello world"
End Sub
In this case, we assign the value (.Value =) of “Hello world” to cell A1 (Range(“A1”)). Later we will see how to use “Range” and “Value”.
- Ready! The macro is now created. You can close the VBA editor.
- To run it, go to the Macros menu, select the macro and click “OK”.
- If this way you obtain:

You can also run a macro by selecting the code in VBA and clicking the “Run Macro” symbol or by pressing F5 in Windows. For Mac you must press Fn+Alt+F8.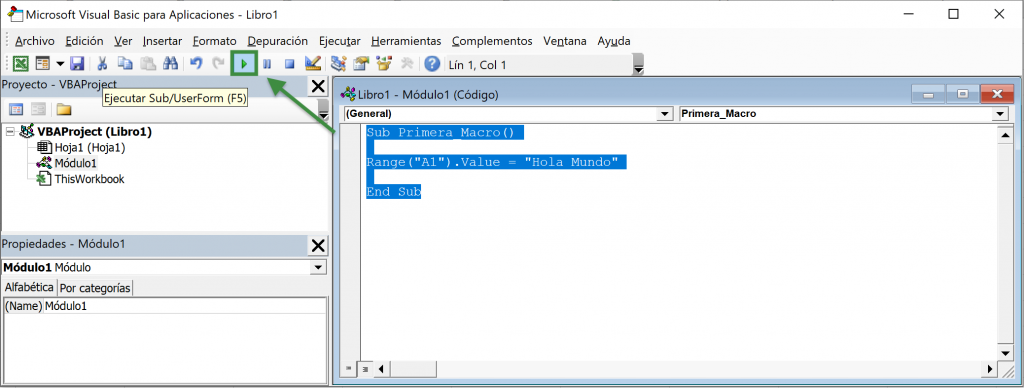
You may also find it more convenient to create a button for a macro. To learn how to create a button and associate it with a macro watch this video:
Windows with messages: MsgBox in VBA
A common use of macros using VBA in Excel is to make message windows. It is also known by its VBA abbreviation: MsgBox. Msgbox is very useful for sending messages letting you know what is being done on the spreadsheet or for giving welcome messages.
Simplified syntax:
MsgBox(message[,buttons][,title])
To see the full syntax, button options and more details of how MsgBox works you can see this Microsoft article.
Arguments:
- message: is the message that you want to display. It has a maximum of 1024 characters. The text must be enclosed in quotes.
- [buttons]: is a numerical expression that is related to types of buttons. The default value is 0 which means “Ok”. It's optional.
- [title]: is the title of the window. It's optional.
Let's look at examples of MsgBox in VBA:
- Simple message: In a VBA module write the following:
Sub Message_1()
MsgBox ("Hello World")
End Sub
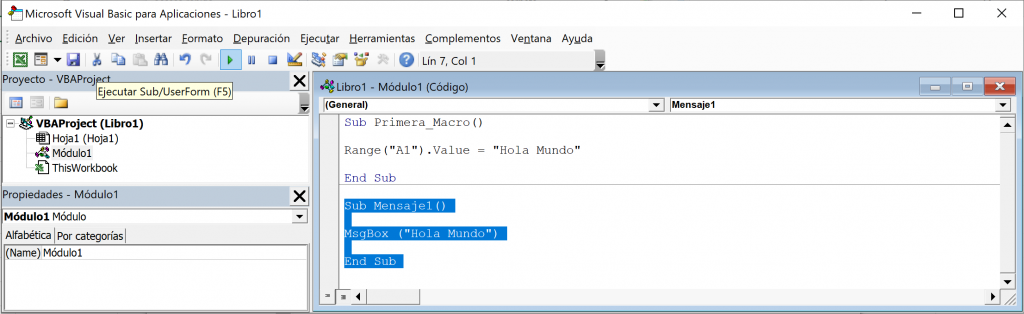
Ninja Tip: Note that you should not create a new module to create a new macro. To add a new macro you just have to write it below in the same module.
Then, the macro is executed and we obtain the window that says “Hello World”, as seen in the following image: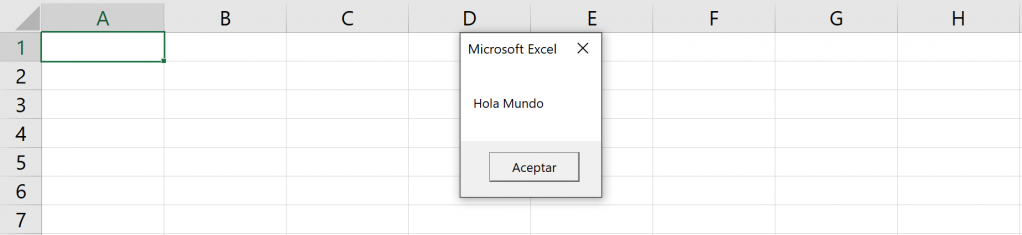
- Message that includes the value of a cell: To combine words and the value of a cell, “&” is used. Try the following code:
Sub Message_2()
MsgBox ("Total sales is " & Range(“C8”).Value)
End Sub
When you run the macro you get: 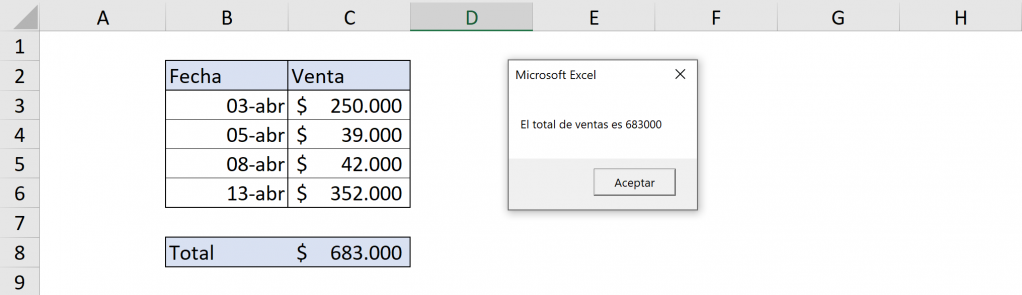
Create variables in VBA: Use “Dim”
For most macros, you need to create a variable. To create variables in VBA, the “Dim” command is used.
Simplified syntax:
dim variable [Ace guy]
For the full syntax, which is beyond the scope of this article, you can see this Microsoft article.
Arguments:
- Dim: means “dimension” and with this command you can create variables.
- variable: The name of the variable you are creating. This name is defined by you.
Ninja Tip: the variable name does not use spaces. If you want to name it with more than one word, you can use capital letters for the beginning of each word or underscore as a separator.
- [As type]: As means “as” and then you choose the type of variable it is. The most common are:
- String: for words
- Integer: for whole numbers
- Decimal: for decimals
- Variant: used for both numbers and words
- Range: for a set of cells
To see all types of variables you can see this Microsoft article.
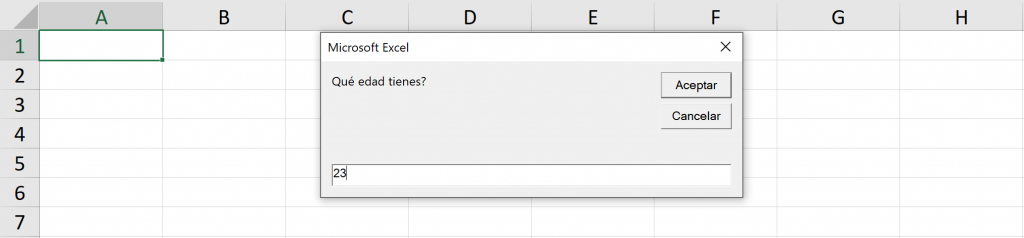
As an example we will create a variable “my_value”. The VBA will input your age in years using InputBox, which works the same as MsgBox. Then, it will transform your age into months (multiplying by 12) and type it into cell A1. See the following code:
Sub Age_in_months()
'Create the variable “my_value”
Dim my_value As Integer
'Defines my_value as the entered value
my_value = InputBox("How old are you?")
'Write in A1
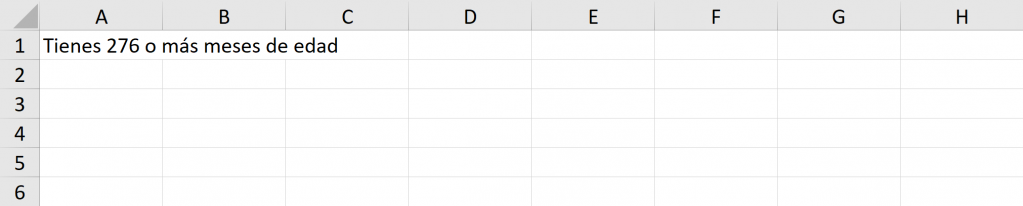
Range("A1").Value = “You are ” & my_value * 12 & “ or more months old”
End Sub
When we execute it, the window appears and we fill in:
Then, when you click on “Accept” and it appears:
Cell selection in VBA: “Range”
The “Range” object is one of the most important in Excel VBA, it means “Range” and is the representation of the cells in the code. It can be a column, a row, a cell, a set of separate cells, etc.
There are a series of actions that can be done to cells such as selecting them (Select), giving them a value (Value), emptying them (Clear), etc. These actions are called “methods”. You can see all the method options for “Range” in this Microsoft article. The methods are used by putting a period and then writing what you want to do.
Simple ranges:
Let's look at some examples to understand how it works:
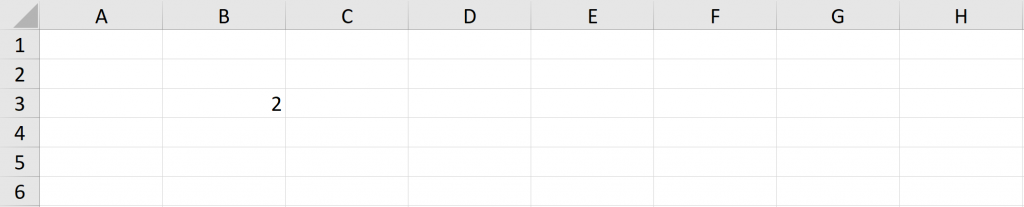
- Give the cell a value: To say “cell B3” write “Range(“B3”)” and then, to give it the value 2, add “.Value = 2”
SubRank1()
Range("B3").Value = 2
End Sub
When we run the macro we see:
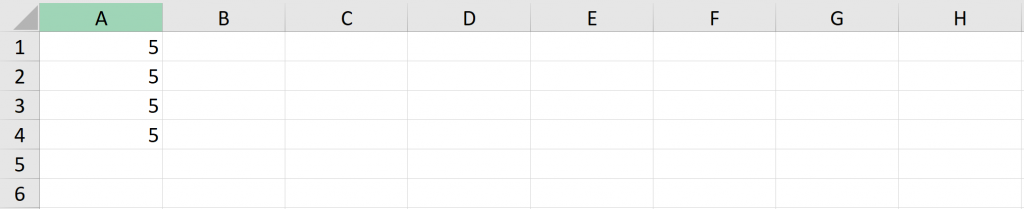
- Give a value to several cells: To call cells from A1 to A4, write “Range(“A1:A4”)” and then assign them the value 5 by writing “.Value = 5”
SubRank2()
Range("A1:A4").Value = 5
End Sub
When we run the macro we get:
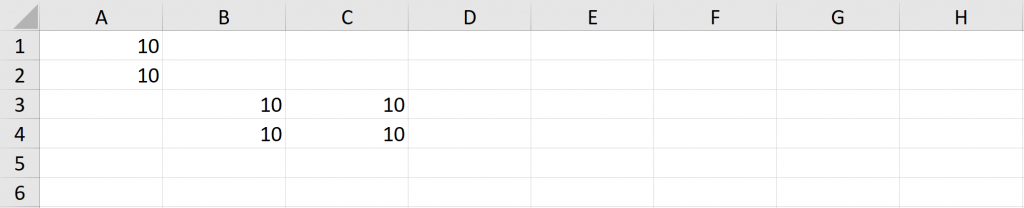
- Give a value to several cells that are not together: To call the cells from A1 to A2 and from B3 to C4, write “Range(“A1:A2,B3:C4”))” and then assign them the value 10 by writing “.Value = 10”.
SubRank3()
Range("A1:A2,B3:C4").Value = 10
End Sub
By executing the macro we obtain:
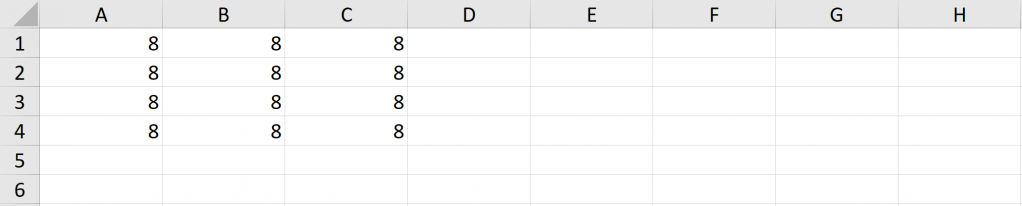
- Create variable “Example” which is a set of cells and assign them the value 8: What you have learned from creating variables is applied, then that variable is defined as the cells we want and then the action is taken on the variable.
SubRank4()

'Example variable is created
Dim Example As Range

'Example is defined as cells A1 to C4
Set Example = Range("A1:C4")

'All Example cells are given the value 8
Example.Value = 8

End Sub
After executing the macro we have:
- Create a variable that is a set of cells and empty them: Apply what you have learned about creating variables, then define that variable as the cells you want and then perform the action on the variable.
SubRange5()

'Example variable is created
Dim Example As Range

'Example is defined as cells A2 to C4
Set Example = Range("A2:C4")

'We empty the Example cells
Example.Clear

End Sub
If we had this at the beginning:
After executing the macro we obtain:
- Create a variable that is a set of cells and select them: It is similar to the previous case, but only those cells are selected.
SubRank6()

'The variable Example2 is created
Dim Example2 As Range

'Example2 is defined as cells from B2 to C4
Set Example2 = Range("B2:C4")

'Select the cells in Example2
Example2.Select

End Sub
When you run the macro you get:
Dynamic range:
What if we want to apply the macro to all the cells I have selected? In VBA, “Selection” is used to say “the cells that are selected when the macro is executed.”
For example, to make a macro that assigns the value 5 to all selected cells:
Sub Selection_5()

Dim range As Range
Set range = Selection
range.Value=5

End Sub
You could also write:
Sub Selection_5()
Selection.Value=5
End Sub
If before executing the macro the following was selected:

After executing the macro it results:
Range to last entry:
Sometimes we don't want to select everything every time we want to run the program, but rather we prefer it to go to the last term of a table. In Excel VBA, to identify the last filled cell you use “.End(xlDown)” after the cell you start from.
Ninja Tip: You can also use xlUp, xlToRight and xlToLeft to go to the last cell up, right and left, respectively.
Let's see different applications with the following examples:
- Select last non-empty row: The following VBA code takes C3, then goes all the way down from C3 and selects that last cell:
SubRangeLastEntry1()

Range("C3").End(xlDown).Select

End Sub
When you run the macro you get:
If you notice, this code is equivalent to pressing C3 then Ctrl+Down Arrow
- Select from a certain cell to the last: This VBA code selects from C3 all the way down from C3:
SubRangeToLastEntry1()
Range(Range("C3"), Range("C3").End(xlDown)).Select
End Sub
When you run the macro you would see the following:
If you notice, this Code is equivalent to pressing C3 then Ctrl+Shift+Date down
- Select from current to last: The following VBA code selects from the currently selected cell to the end:
SubRangeToLastEntry2()
Range(ActiveCell, ActiveCell.End(xlDown)).Select
End Sub
Ninja Tip: Why is ActiveCell used and not Selection? For VBA, ActiveCell is the cell you selected if you selected a single cell or the first cell you selected within a group. Selection is the set of all the cells you selected. So, to select from a single cell down we use ActiveCell.
Thus, if cell C3 is selected when executing the macro, the result is the same as the previous example:

If the macro is executed with cell C5 selected, the following is obtained: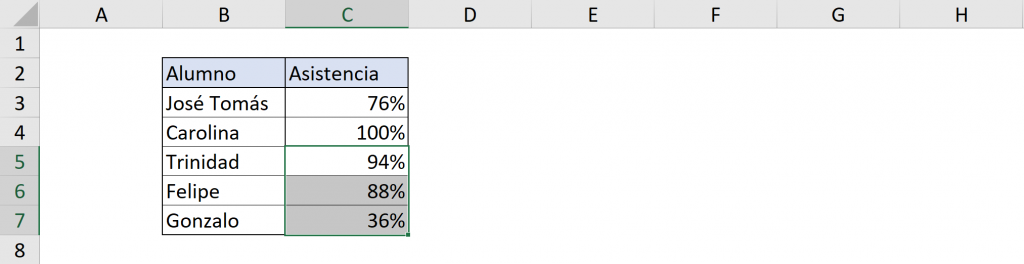
Range of entire rows and columns
If we want to select or execute an action on entire rows or columns in VBA we do it in the same way:
- “Cells” in VBA is used for the entire spreadsheet. In this case the entire spreadsheet is selected:
Sub Select_All()
Cells.Select
End Sub
Running this results in:
- In VBA to select complete columns you use “Columns” and the number that corresponds to the column (A is 1, B is 2, etc). In the example below, we want to empty column B:
Sub Empty_B()
Columns(2).Clear
End Sub
If we start with this:
Running the VBA code results in:
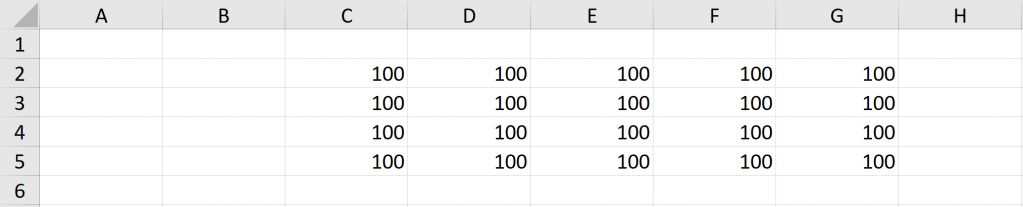
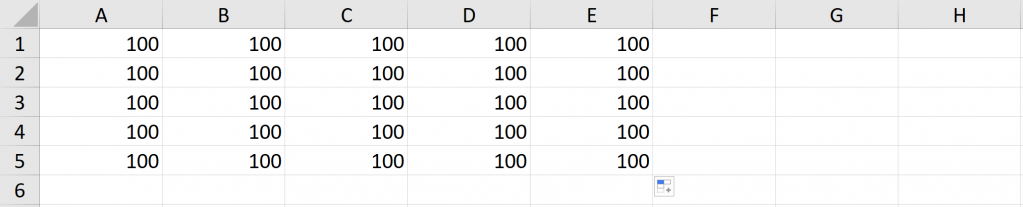
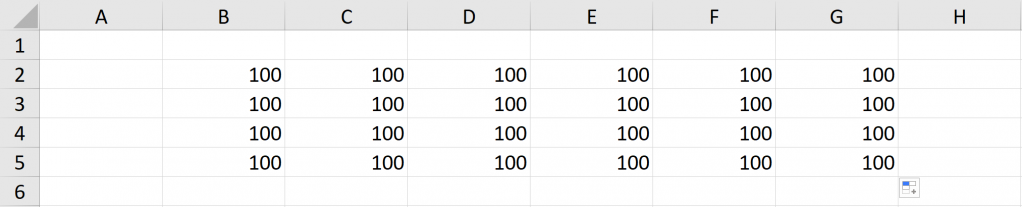
- To select complete rows in VBA, use “Rows” and the corresponding row number. In this case, they are all assigned the value 100:
SubRows_100()
Rows("2:5").Value=100
End Sub
Running this results in: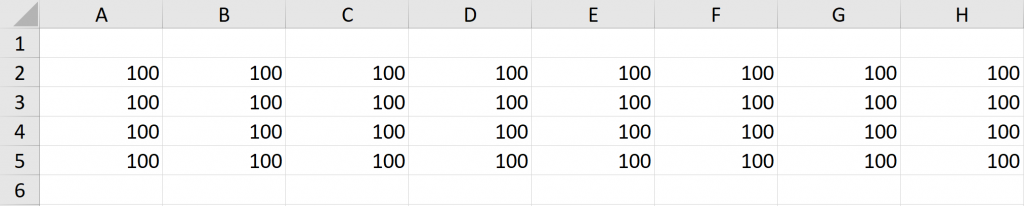
The IF conditional in VBA
The “If” command in VBA is used to execute certain instructions only if certain conditions are met. The structure of this command is similar to IF function.
Structure:
If Condition Then
Code that is executed when the condition is met
Else
Code that is executed when the condition is not met
End if
Arguments:
- “If”: means the conditional “If”.
- “Then”: means “Then” and serves to assign what happens if the conditions are met.
- “Else”: means “Else” to indicate what to do if the condition is not met.
- “End If”: You should use it if you use more than one line to express the condition and its related instructions.
There is an abbreviated version in which you only give the instruction if the condition is met and if it is not met nothing happens:
If Condition Then Statement
To better understand this command, let's look at a couple of examples.
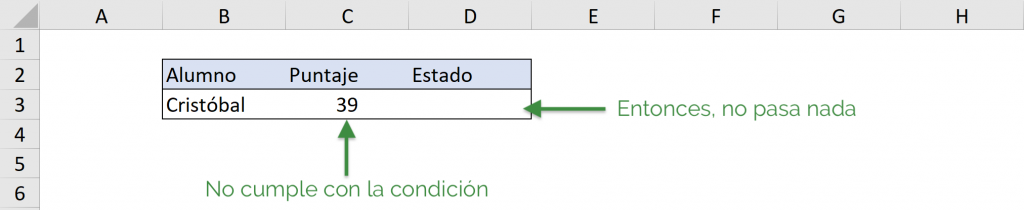
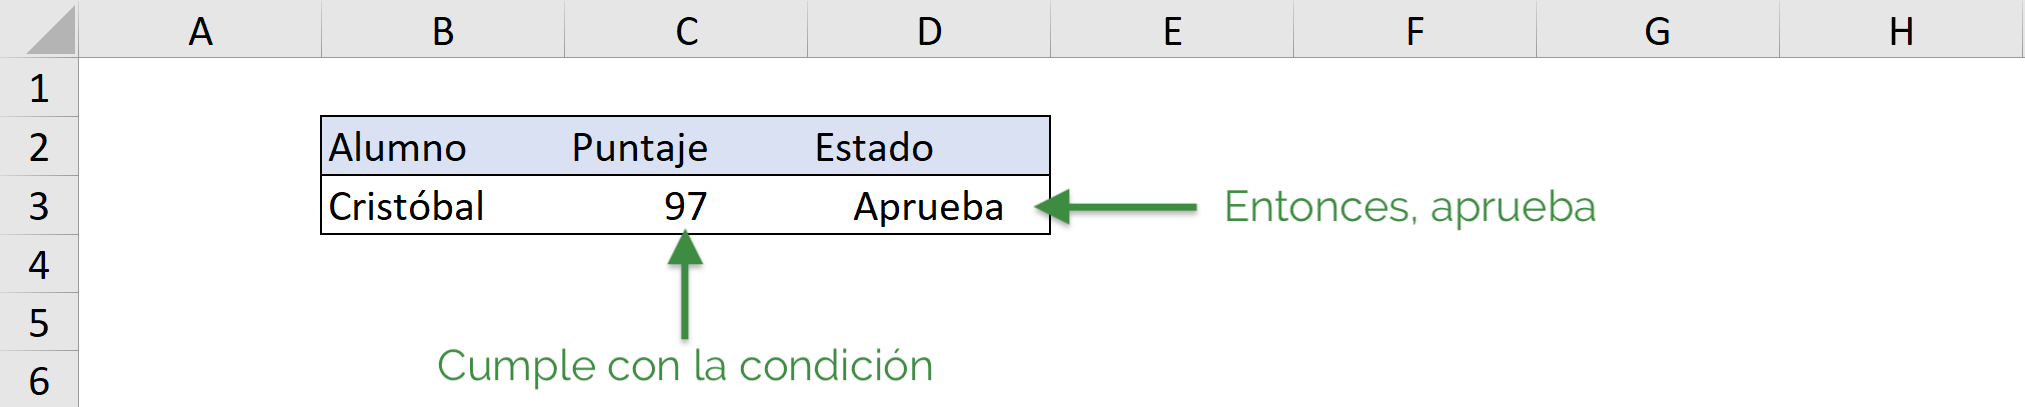
- Abbreviated condition: In the following code a condition is set to pass a subject.
Sub Pass_Retest()

'Variables are created
Dim score As Integer, result As String

'The score variable is defined as the value of cell C3
score = Range("C3").Value

'If the score is greater than or equal to 60, then the result variable is “Pass.”
If score >= 60 Then result = "Pass"

'The value of cell D3 will be equal to the result variable
Range("D3").Value = result

End Sub
So, if we start from the following:
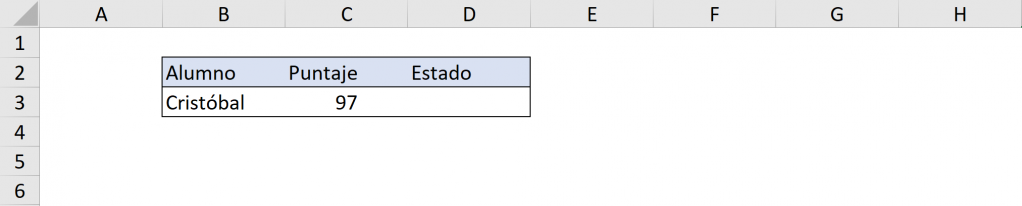
By executing the macro we obtain:

If we start from the following, since we did not define what happened if the condition was not met when executing the macro, nothing happens:
Ninja Tip: You can use the following operators to compare: equal (=), different (<>), greater (>), greater than or equal (>=), less (<) and less than or equal (<=). You can also use “Not” to say that a condition is not met.
- If we use the “long” version of “If” for the same case above, we can decide what happens if the condition is not met. See the following code:
Sub Pass_Retest2()

'Variables are created
Dim score As Integer, result As String

'The score variable is defined as the value of cell C3
score = Range("C3").Value

'If it is the one whose score is greater than or equal to 60, then:
If score >= 60 Then

'the result variable is “Aprove”
    result = "Pass"

'If it's not like that
Else

'the result variable is “Retest”
    result = "Fail"
End If

'The value of cell D3 will be equal to the result variable
Range("D3").Value = result

End Sub
In the same previous example, when executing the macro we are left with:
And in this case:

Logical operators can be used within the conditions: “And”, “Or” and “Not”. Let's see an example of each one:
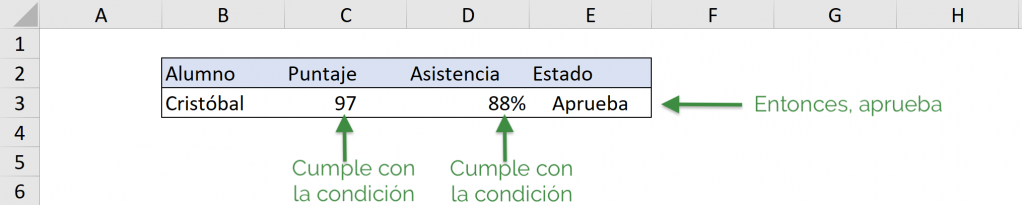
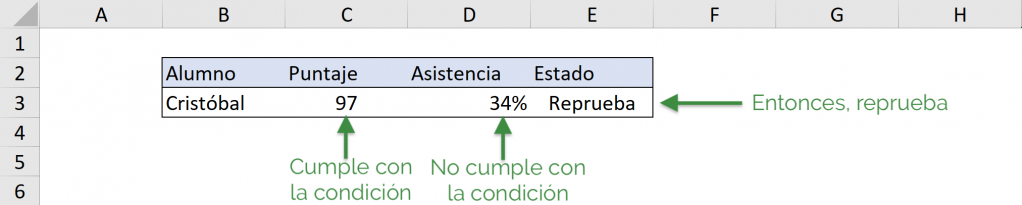
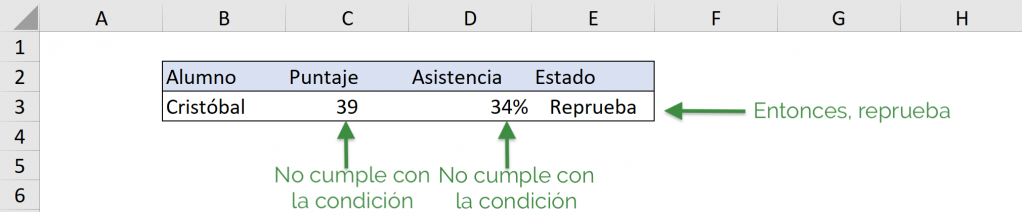
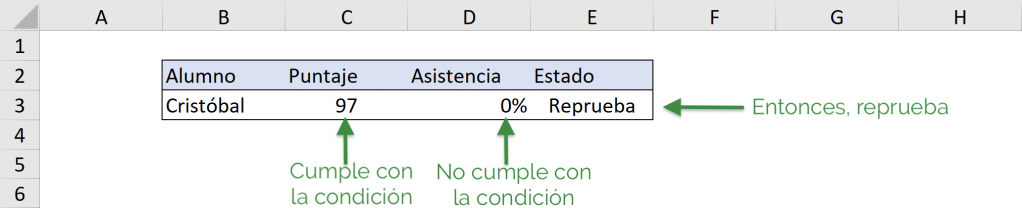
- When using “And” in a condition, both conditions must be met for it to be met. In this example, score 1 must be greater than 60 and attendance greater than 45% to pass.
SubAnd_Use()

'Variables are created
Dim score As Integer, attendance As Integer, result As String

'Score is defined as the value of cell C3
score = Range("C3").Value

'Score is defined as the value of cell D3
assist = Range("D3").Value

'If it is the one whose score is greater than or equal to 60 and the attendance is greater than 45%
'then approve; If you don't comply, fail:
If score >= 60 And attendance > 0.45 Then
    result = "Pass"
Else
    result = "Fail"
End If
'The value of cell E3 will be equal to the result variable
Range("E3").Value = result

End Sub
In the following case, when executing the macro the result is Pass because it meets both conditions:
In this case, since both conditions are not met, the result is Fail:
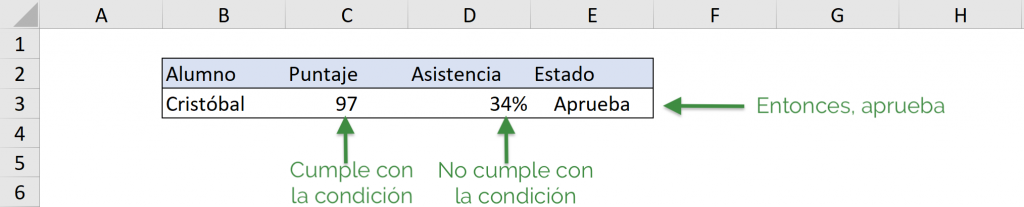
- When using “Or” in a condition, at least one condition must be met for it to be met. In this example, score 1 must be greater than 60, attendance must be greater than 45%, or both to pass.
Sub Or_Use()

Dim score As Integer, attendance As Integer, result As String
score = Range("C3").Value
assist = Range("D31").Value

If score >= 60 Or attendance > 0.45 Then
    result = "Pass"
Else
    result = "Fail"
End If

Range("E3").Value = result

End Sub
In this case, as it meets at least one condition it also approves:
In the following case, since it meets both, the result is Pass:

Finally, in this case, since it does not comply with any, the result is Fail:
- When using “Not” the condition is that something does not happen. In this example, it will be approved if score 1 is greater than 60 and attendance is not zero.
Sub Not_Use()

Dim score As Integer, attendance As Integer, result As String
score = Range("A1").Value
assist = Range("B1").Value

If score >= 60 And Not attendance = 0 Then
    result = "Pass"
Else
    result = "Fail"
End If

Range("C1").Value = result

End Sub
In the following case, since it meets both, the result is Pass:
In this case, it does not meet the second condition, so the result is Fail:
You can also use the “If” conditional combined with other types of actions, for example with MsgBox. For example, see this code:
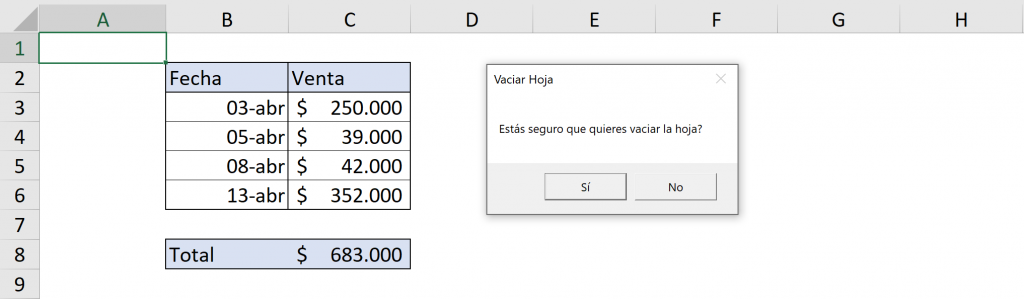
Sub Empty_Sheet()

'The response variable is created (seen in the next section)
Dim response As Integer

'The response variable is defined as whatever is chosen in the window
response = MsgBox("Are you sure you want to empty the sheet?", vbYesNo, "Empty Sheet")

'It is defined that if the answer is “Yes” then the cells will be deleted and if you choose '“No” nothing happens (will be seen later in this article)
If response = vbYes Then Cells.ClearContents

End Sub
When executed, the window that asks the question opens, giving two options: “Yes” and “No” as seen in the image. If you answer “Yes”, the contents of the Sheet are deleted. If you answer “No”, nothing happens. Later we will see in detail the use of “If” that marks conditions.
The FOR loop in VBA
Another common tool in Visual Basic (VBA) is the use of loops with the “For” command. With a “For” loop you can repeat a code the number of times you determine so you don't have to write it every time for each case.
Structure:
For counter = beginning to final

Code

Next counter
Arguments:
“For”: means “For”, meaning that “for those values” the code is repeated.
“To”: means “Until”. Indicates up to what value the counter takes.
“Next”: It means “Next”, when this line is reached it is redirected back to “For” to execute everything again until the list is finished.
- Simple loop: a list of numbers is looped and the code is executed as many times as the loop says. Check this example:
Sub First_Loop()

'We create the counter variable “i”
Dim i As Integer

'We say that i will take the values from 1 to 6
For i = 1 To 6

'This Code is going to be executed for each value of i
    Cells(i, 1).Value = 100 + i

'Go back to “For” until the enumeration is finished
Next i

End Sub
In this first loop the lines between “For” and “Next” will be repeated six times. For i=1, Visual Basic (VBA) will assign the value 100+1 to Cell(1,1). When the code reaches “Next i”, it will make i increment by one and return to “For”. Then, for i=2 VBA will assign the value of 100+2 to Cell(2,1) and so on up to 6.
When you run this macro you get:

Ninja Tip: Here to refer to cells we use Cells(row, column). Thus, Cells(1,1) is cell A1 and Cells(2,3) is cell C2.
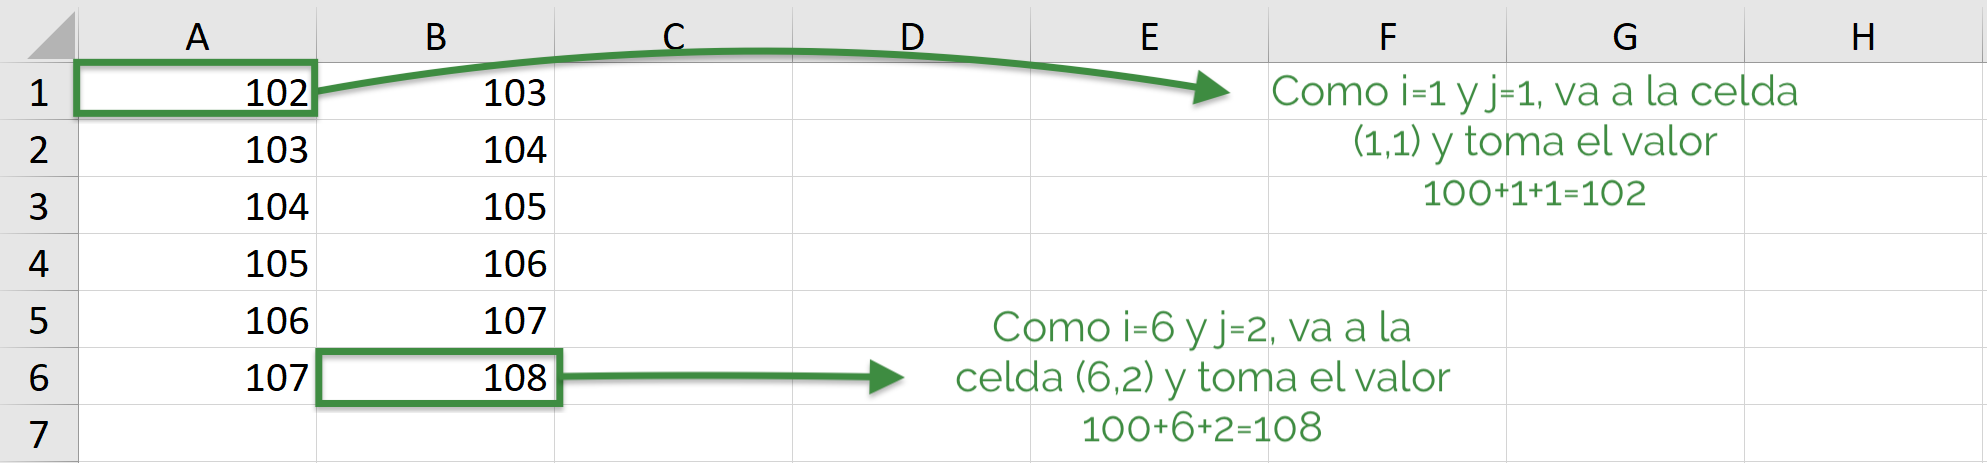
- Double Loop: you can make as many loops as you want, one inside the other. “For” loops work sequentially: they go from the outside to the inside, and only once what is inside is finished, does it take back what is outside.
Sub Loop_Double()

Dim i As Integer, j As Integer

For i = 1 To 6
    For j = 1 To 2
        Cells(i, j).Value = 100 + i + j
    Next j
Next i

End Sub
In this example for i=1 and j=1 VBA is going to put the value of 100+1+1 in cell (1,1). Then the code gets to “Next j”, so j increments by 1 and goes back to “For j”.
Then, with the value i=1 and j=2 VBA will put the value 100+1+2 in cell (1,2). Then the code reaches Next j, but ignores it since there are no more (j went from 1 to 2).
Thus, the code reaches “Next i” and thus increases the value of i by 1 and returns to “For i” and therefore j is counted again from 1. Now with i=2 and j=1, VBA writes in cell (2,1) the value 100+2+1. In this way it continues through the entire list until i=2 and j=6.
When you run this macro you get:

- Defined range loop. If we want the “For” loop to go through different cells of a range, “For Each” + “In” is used. This is how it is said “For each cell within the selected. We can review exercise 4 from the Simple Ranges section and understand the conditional and loop:
SubRangeToLastEntry()

'Variables are created
Maximum dim As Double, range As Range, cell As Range

'Range is defined as all cells between the active and the last filled to the bottom
Set range = Range(ActiveCell, ActiveCell.End(xlDown))

'They all turn white
range.Inner.ColorIndex = 0

'Maximum is defined as the maximum value of the range cells
maximum = WorksheetFunction.Max(range)

'For each cell in range
For Each cell In range

'If its value is the maximum, then paint it red
    If cell.Value = maximum Then cell.Interior.ColorIndex = 22

'It goes to the next cell
Next cell

End Sub
If for example we had this:

Running the macro results in:
Ninja Tip: You can use the same functions you use in Excel like the MAX function by typing “WorksheetFunction.” and then the function. In this example WorksheetFunction.Max(range) was used
- Now let's do the same application as above but using range to the last cell. The only difference is how we define the range.
SubRangeToLastEntry3()

'Variables are created
Maximum dim As Double, range As Range, cell As Range

'The range variable is defined as everything from the selected cell to the end
Set range = Range(ActiveCell, ActiveCell.End(xlDown))

'Then the entire range is filled with white
range.Inner.ColorIndex = 0

'Maximum is defined as the maximum value of the selected
maximum = WorksheetFunction.Max(range)

'The following defines: “if the cell value is the maximum, fill it in red”
For Each cell In range
    If cell.Value = maximum Then cell.Interior.ColorIndex = 22
Next cell

End Sub
Thus, we have selected C3 when executing the macro, the result is the same:

If the macro is executed with C5 selected, the following is obtained:

Example applying everything learned
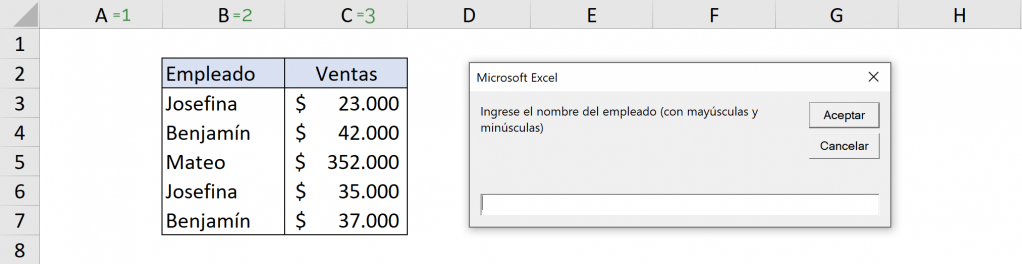
In this example we will make a total sales calculator for an employee. Review the following VBA code:
Sub Sales_Calculator()

Dim employee As String, total As Double, i As Integer
employee = InputBox("Enter the employee's name (case sensitive)")
total = 0

    For i = 3 To 7
        If Cells(i, 2).Value = employee Then
        total = total + Cells(i, 3).Value
        End If
    Next i

MsgBox "Total sales of " & employee & " is " & total

End Sub
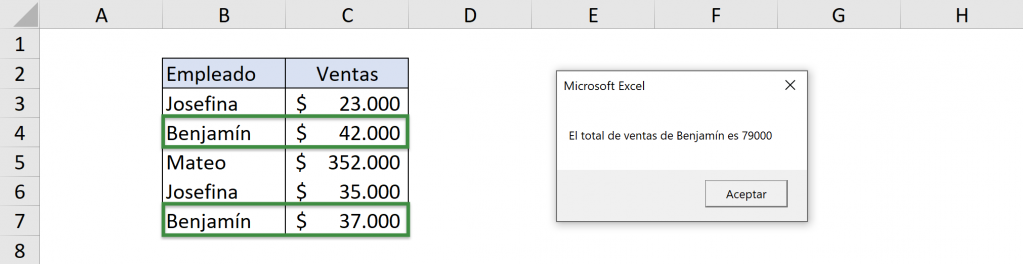
The idea is that the “For” loop goes through the cells from (3,2) to (7,2), that is, from B3 to B7, seeing if the employee's name corresponds to the one entered in the window. If it is the employee, then the value of that employee's sales is added to the “total” variable. After going through all the cells, a window appears reporting the employee's sales.
In this case, when executing the macro the window appears:
If you write “Benjamín” in the window, then you get:
Complement a recorded macro with Visual Basic (VBA)
In the following video you can see an example of how a macro was created with the macro recorder and is complemented with Visual Basic (VBA) to achieve what you are looking for.
In this video the macro is created using the “Macro Recorder”:
And in this video it is modified with VBA:
Now that we understand VBA, let's move on...
The basics of Loops in VBA
Purpose: Save time and avoid mistakes by making an Excel macro that involves doing the same thing several times. Instead of writing it many times, it is done with a loop so that it is done automatically. The most common loop is the one that uses “For Next”.
“For Next” Loop Structure:
For counter = beginning to final
Code
Next counter
Arguments:
“For”: means “For”, meaning that “for those values” the code is repeated.
“To”: means “Until”. Indicates up to what value the counter takes.
“Next”: means “Next”, when this line is reached it is redirected back to “For” to execute everything again until the list is finished.
Counter: it is a variable that in general we will define as a number and you can give it whatever name you want. In this article we will use “i”, but you can use “tuna” or whatever name you want.
Simple Loops
The VBA loop loops through a list of numbers and executes the code as many times as the loop says. Check this example:
Sub Primer_Loop() 'We create the counter variable “i” Dim i As Integer 'We say that i will take the values from 1 to 6 For i = 1 To 6 'This Code will be executed for each value of i Cells(i , 1).Value = 100 + i 'Go back to “For” until the enumeration is finished Next i End Sub
In this first VBA loop, the lines between “For” and “Next” will be repeated six times. The loop starts with i equal to 1. Thus, VBA goes to Cell(1,1) and assigns the value 100 + 1. When the code reaches “Next i”, it will make i increase by one (i will take the value of 2) and return to “For”. Then, for i=2 VBA is going to assign the value of 100+2 to Cell(2,1) and so on up to 6. Remember that “i” which is the counter could have had any name, as long as in All code will use the same name to call that counter.
When you run this macro you get:
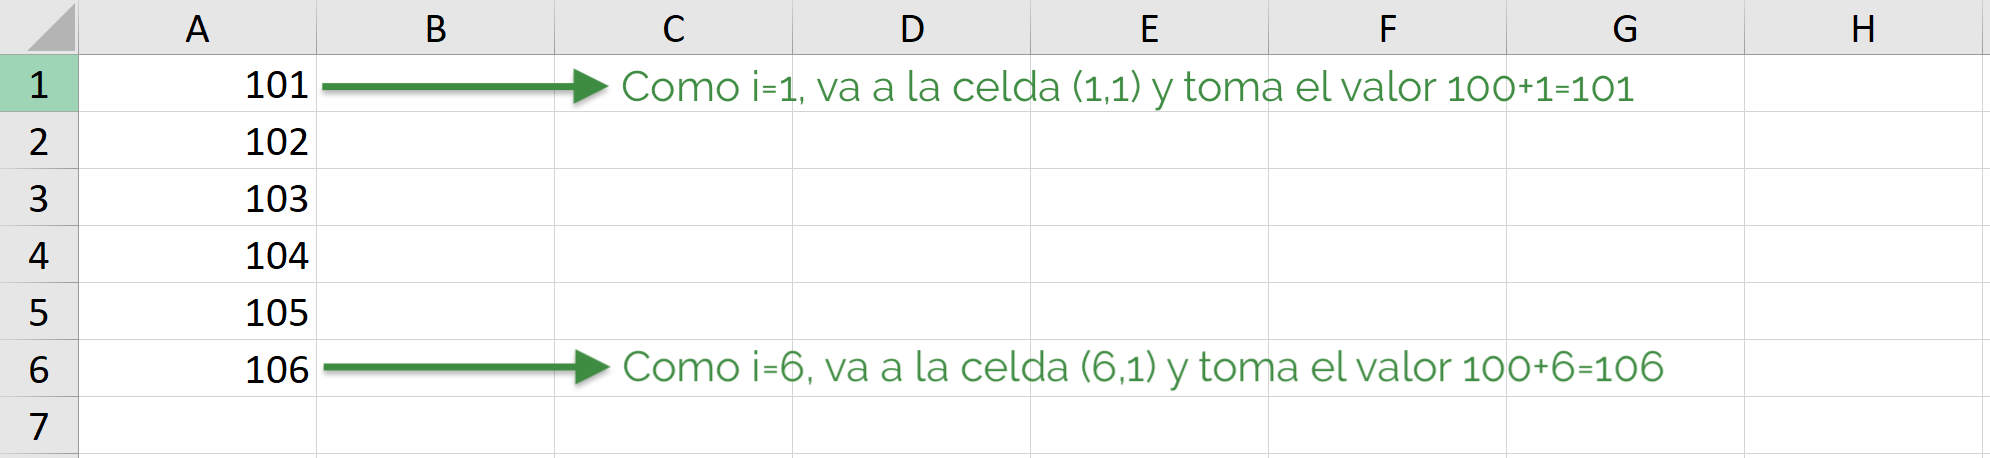
Ninja Tip: Here to refer to cells we use Cells(row, column). Thus, Cells(1,1) is cell A1 and Cells(2,3) is cell C2.
Double Loops
You can make as many loops as you want, one inside the other. “For” loops work sequentially: they go from the outside to the inside, and only once what is inside is finished, does it take back what is outside.
Sub Loop_Double() Dim i As Integer, j As Integer For i = 1 To 6 For j = 1 To 2 Cells(i, j).Value = 100 + i + j Next j Next i End Sub
The explanation is the following:
- In this example for i=1 and j=1 VBA is going to put the value of 100+1+1 in cell (1,1) (which is A1). Then the code gets to “Next j”, so j increments by 1 and goes back to “For j”.
- Then, with the value i=1 and j=2 VBA will put the value 100+1+2 in cell (1,2) (which is B1). Then the code reaches Next j, but ignores it since there are no more (j went from 1 to 2).
- Thus, the code reaches “Next i” and thus increases the value of i by 1 and returns to “For i” and therefore j is counted again from 1. Now with i=2 and j=1, VBA writes in cell (2,1) (which is A2) the value 100+2+1. In this way it continues through the entire list until i=2 and j=6.
When you run this macro you get:
Do While Loops
Aside from “For Next” loops, there are other types of loops in VBA that can be useful. A very common example is “Do While” which, as its meaning in English says, the loop code will be executed while a condition that is initially established is met.
Do-While Loop Structure:
Do While condition
Code
Loop
Arguments:
“Do While”: means “Do while”, meaning that as long as the condition is met, it will do the action of the following code.
“Loop”: Closes the loop, that is, it marks that the code that is executed ends there if the condition is met. Upon reaching the Loop, it returns to “Do While” every time until the condition is not met.
See the following example:
Sub DoWhile() 'The variable i is created which is an integer Dim i As Integer 'Part defined with the value of 2 i = 2 'While i is less than 6. Do While i < 6 'This Code will be executed for each value of i Cells(i, 3).Value = Cells(i,2).Value +i 'Now i is redefined, as 1 more than the value that i = i + 1 had 'When we get here it becomes to Do While until the condition is not met (i=6) Loop End Sub
The explanation is the following:
- As we can see, i starts with the value 2 when entering the “Do While” loop and when the condition of being less than 6 (1<6) is met, the code that is inside the loop is executed.
- This code means: cell (2,3), that is, C2 will be equal to B2+2, since in this case the value of i is 2.
- Then comes the key part of the loop: i is updated and takes the value 3 (i=2+1=3).
- Upon reaching “Loop”, VBA returns to “Do While” with i equal to 3. Since this is still less than 6, the code is executed and cell C3 will be equal to B3+2 and i will take the value 3.
- Thus, successively until i, when taking the value 5, defines C5 =B5 + 5 and ei takes the value of 6. When returning to “Do While”, the condition is no longer met: 6 is not less than 6, so it ends the loop.
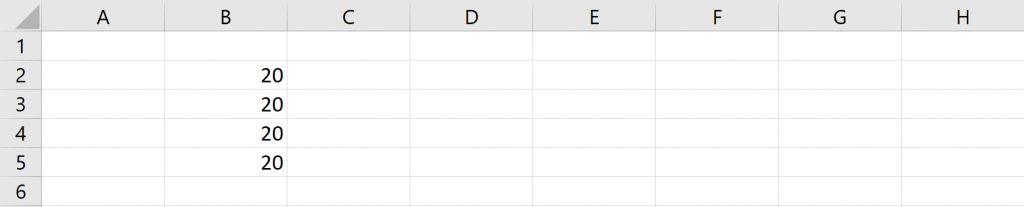
In the following image we can see the initial situation:
Then running the VBA loop you get: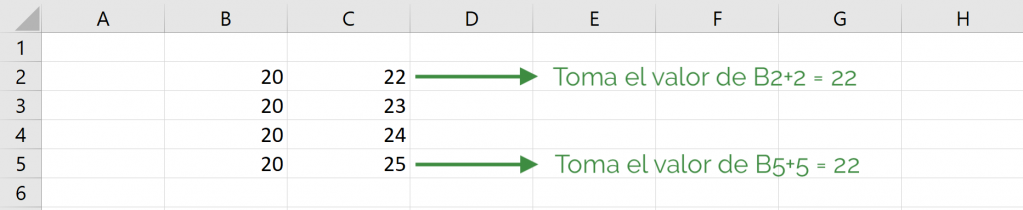
Defined range loops
Within the loops that use the “For” command, we have seen that the “For Next” loop looped through a list of values. If you want the loop to go through different cells of a range (a range is a set of cells), “For In” is used.
For In Loop Structure:
For cell in range
Code
Next cell
Arguments:
“For”: means “For”, meaning that “for those values” the code is repeated.
“In”: means “In”. Indicates that the cell must be within the selected range for the following code to run.
“Next”: means “Next”, when this line is reached it is redirected back to “For” to execute everything again until the next cell is not in the defined range.
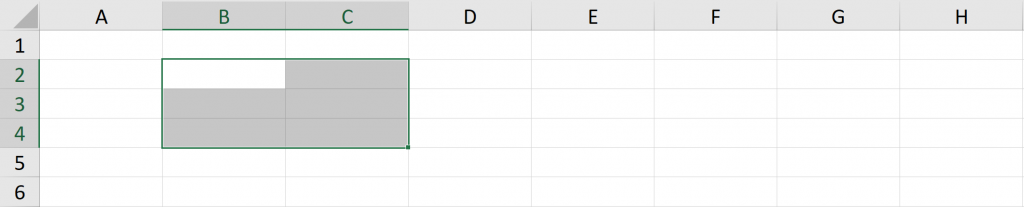
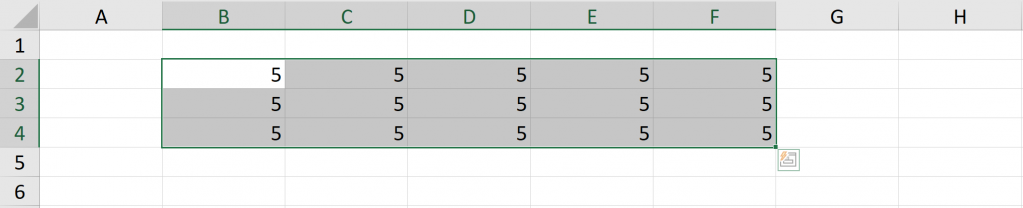
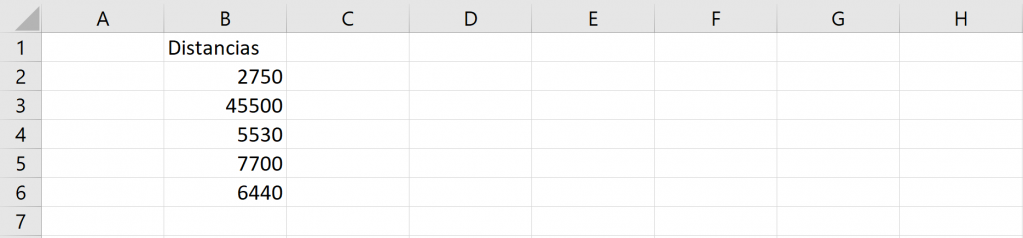
SubDefinedRange() 'The range and cell variables are created as a range of cells Dim range As Range, cell As Range 'The range is defined from B2 to B6 Set range = Range("B2:B6") 'For each cell in the range is executed in the code below For Each cell In range cell.Value = cell.Value / 1000 'It is moved to the next cell and returns to “For Each” until the cell is not in range Next cell End Sub
In this code, the range is first defined, which is from B2 to B6, and then for all the cells in that range (which do not have to be a range in the same column) they are divided by 1,000.
If we start with the following:
After running the VBA loop: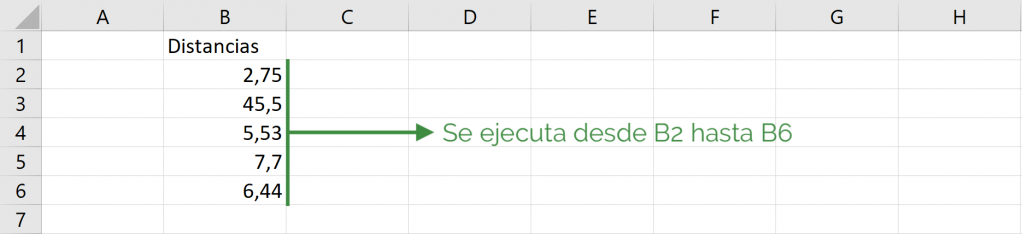
Note that it will only be executed up to cell B6 because we put that in “Set range = Range(“B2:B6”)”. Yes, our Excel spreadsheet looked like this at first:
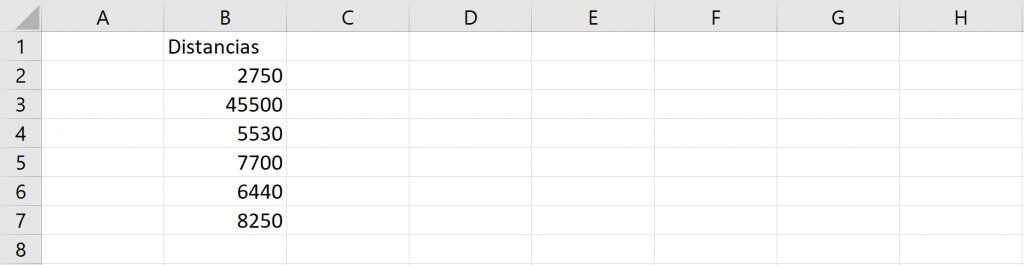
And we run the same code, it will only reach B6:
Ninja Tip: If you want to make this loop go through the cells you have selected, you can change the Set range line to the following:
Set range = Selection

Ninja Tip: If you want to make this loop go through the cells from the selected one to the last filled cell down, you can change the Set range line to the following: Set range = Range(ActiveCell, ActiveCell.End(xlDown))
Loops for the entire column
If you have the goal of using the same code for all rows in a column (all the way to Excel), you can use “For Next” to execute it.
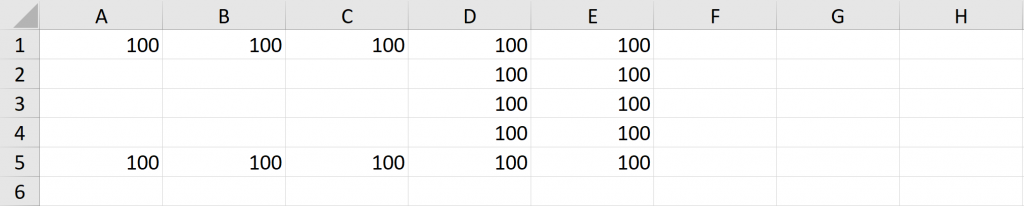
SubColumnLoop() 'The variable i is created as a number. Dim i As Long 'For values from i to the number of rows in Excel, execute the code below For i = 2 To Rows.Count 'For the cell, if its value is greater than D3, then color it blue . If Cells(i, 1).Value > Range("D3").Value Then Cells(i, 1).Font.Color = vbBlue 'Go back to “For” until the enumeration is finished Next i End Sub
Ninja Tip: i is defined as “Long” to define a number that can take very high values, as is the case with the number of rows that Excel has.
In this code the counter (i) takes the values from 1 to the total number of rows in Excel (Rows.Count). Then the code that runs for those cells uses the “If” command, which is a conditional code. You can see the basics of the If command in this article.
If before we had the following:

And after running the macro we get:

Tip Ninja:To make a VBA loop for an entire row use Columns.Count for the counter limit and use Cells(1,i) (in the case of row 1).
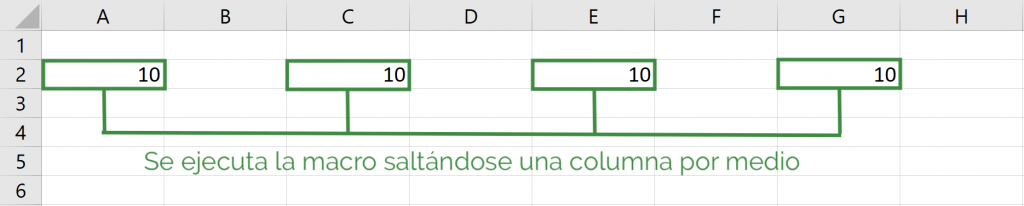
Loops with “Step”
It may be that you want to go through a list of numbers but you don't want to go one by one, but rather you want that code to be executed only for odd numbers or every third number. For that, we are going to use “For Next” and we will add the “Step” command, which means “Step”, that is, the number of steps it takes each time it reaches “Next”. The default value of Step is 1, that is, it goes through the counter values one by one. Check the following example:
Sub StepLoop() 'The variable i is created as an integer Dim i As Integer 'Here the loop runs through values from 1 to 8, but two by two. For i = 1 To 8 Step 2 Cells(2, i).Value = 10 Next i End Sub
The code works as follows:
- We see that i starts with the value of 1 and will go two by two until the value 8.
- Thus, i starts with the value 1 and after leaving cell A2 equal to 10, VBA reaches “Next i” and ei takes the value of 3 since the value of “Step” is 2 (1+2=3).
- Then, cell C2 takes the value of 10 and when it reaches “Next i”, i takes the value of 5 (3+2) and so on.
- Finally, when i takes the value 7 and it is executed that cell G2 is equal to 10, upon reaching “Next i”, it takes the value of 9, leaving the values that i can take within the loop and, therefore , the loop finishes executing.
When you run the VBA loop you get:
Ninja Tip: You can also make the list go “backwards” by making i take values from one greater to one less and putting negative steps, with the following code:
Sub StepNegLoop() Dim i As Integer For i = 8 To 3 Step -1 Cells(6, i).Value = 50 Next i End Sub
Applied example
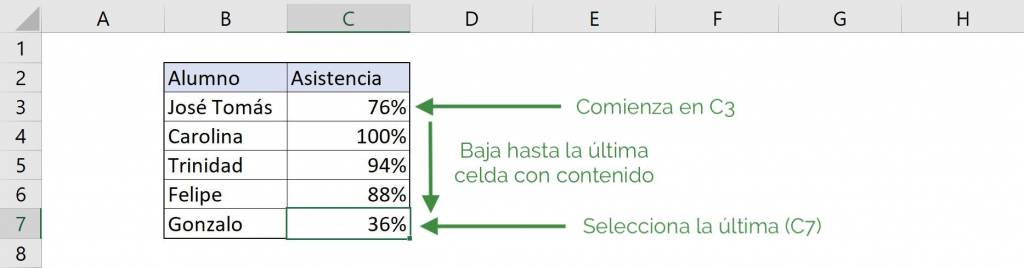
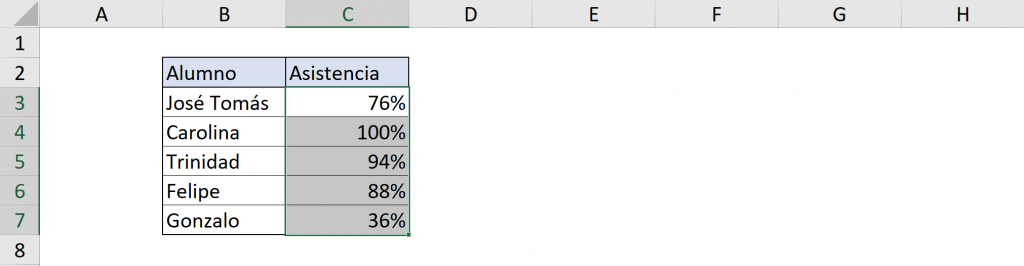
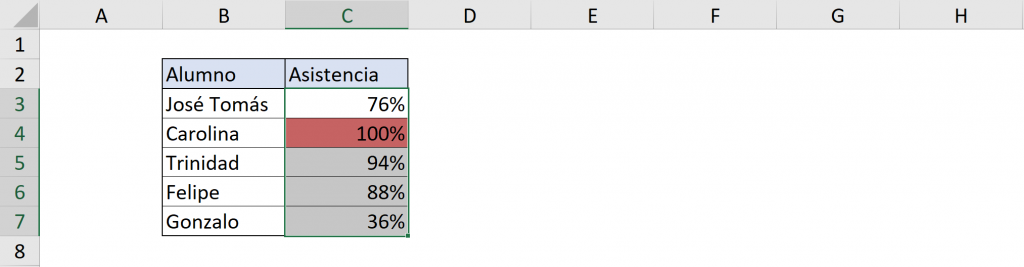
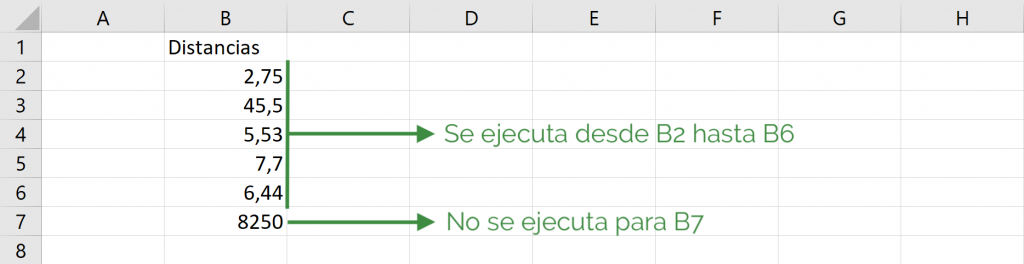
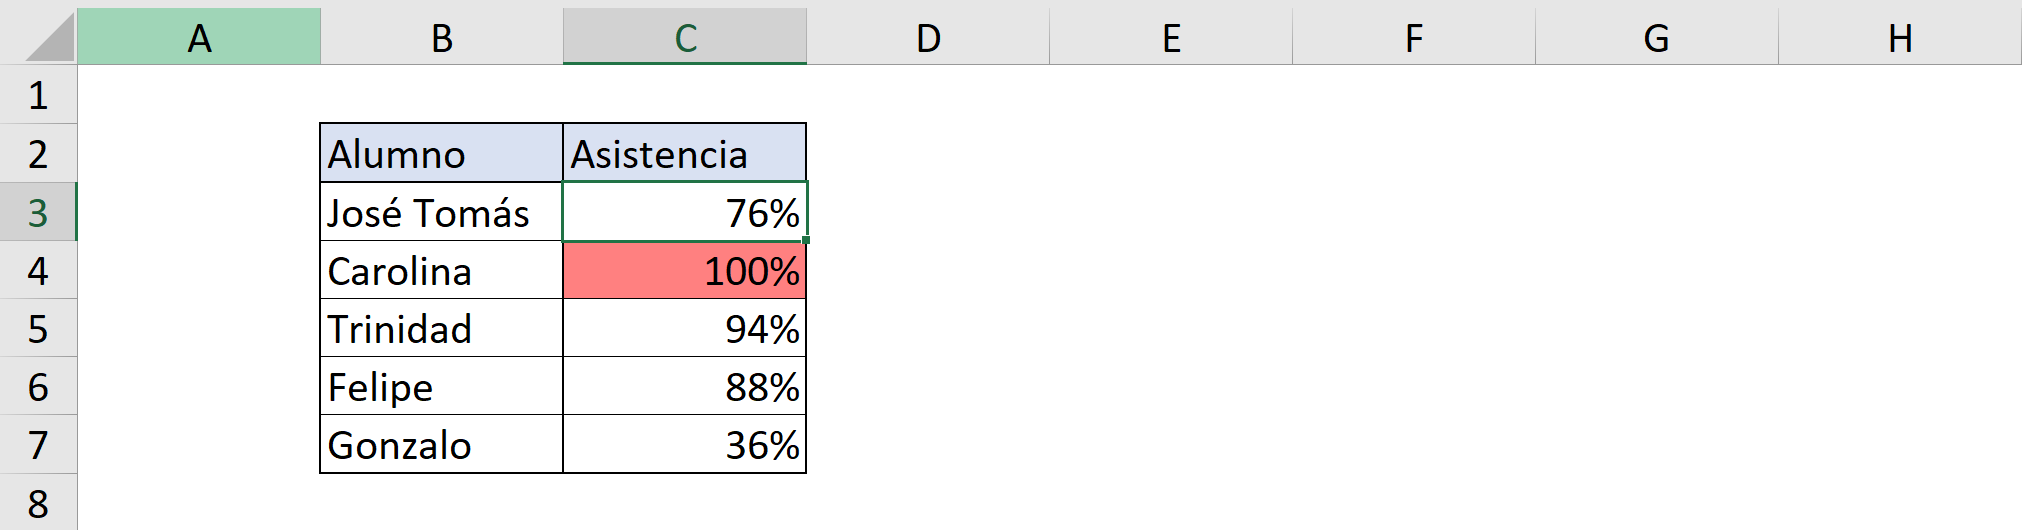
In this example we will use a loop to mark the maximum attendance in a course in red. See the following code:
SubRangeMaximoPuntaje() 'The variables are created Dim maximum As Double, range As Range, cell As Range 'The variable range is defined as everything from the selected cell to the end Set range = Range(ActiveCell, ActiveCell.End(xlDown)) 'Then the entire range is filled with white range.Interior.ColorIndex = 0 'Maximum is defined as the maximum value of the selected maximum = WorksheetFunction.Max(range) 'The following defines: “if the value of the cell is the maximum, fill it with red” For Each cell In range If cell.Value = maximum Then cell.Interior.ColorIndex = 22 Next cell End Sub
Ninja Tip: You can use the same functions you use in Excel like the MAX function by typing “WorksheetFunction.” and then the function. In this example WorksheetFunction.Max(range) was used
Thus, if the macro is executed with cell C3 selected, it is reviewed up to C7 and the maximum is marked:
If the macro is executed with C5 selected, it is obtained, since it starts from C5 to C7 looking for the maximum:

