Solver in Excel: Learning to understand and apply it

Key information
The tool SOLVE Excel allows us to obtain the optimal solution for different decision problems, taking into account a performance measure (objective function), parameters, decision variables and restrictions.
The basics
- Utility: solver nos permite facilitar la toma de decisiones que podamos enfrentar. Un ejemplo es la compra del supermercado, en ella queremos gastar lo mínimo considerando que hay ciertas cosas que no se pueden dejar de lado. ¿Qué elementos escoger? ¿Cómo tomar esta decisión que incluye múltiples consideraciones? Solver te permite resolver este problema a partir de los datos que nosotros introduzcamos en Excel.
- Components
- Objective function: Measure of decision performance. It is what measures how well we are doing given what we want to achieve.
- Parameters: Numbers that do not depend on the decisions we make
- Variables: Numbers that correspond to the decisions we make, or that will be affected by them.
- Restrictions: Possible limitations that my decision presents.
Activating Solver in Excel
The first step when trying to use the Solver tool in Excel is to make sure we have it activated, since it is not in our tools by default. For this we do the following:
Step 1: We click on the “File” option in the main Excel bar:

Step 2: In the left sidebar we click on “Options”.
Step 3: A new sale will open, in which we have to click on accessories: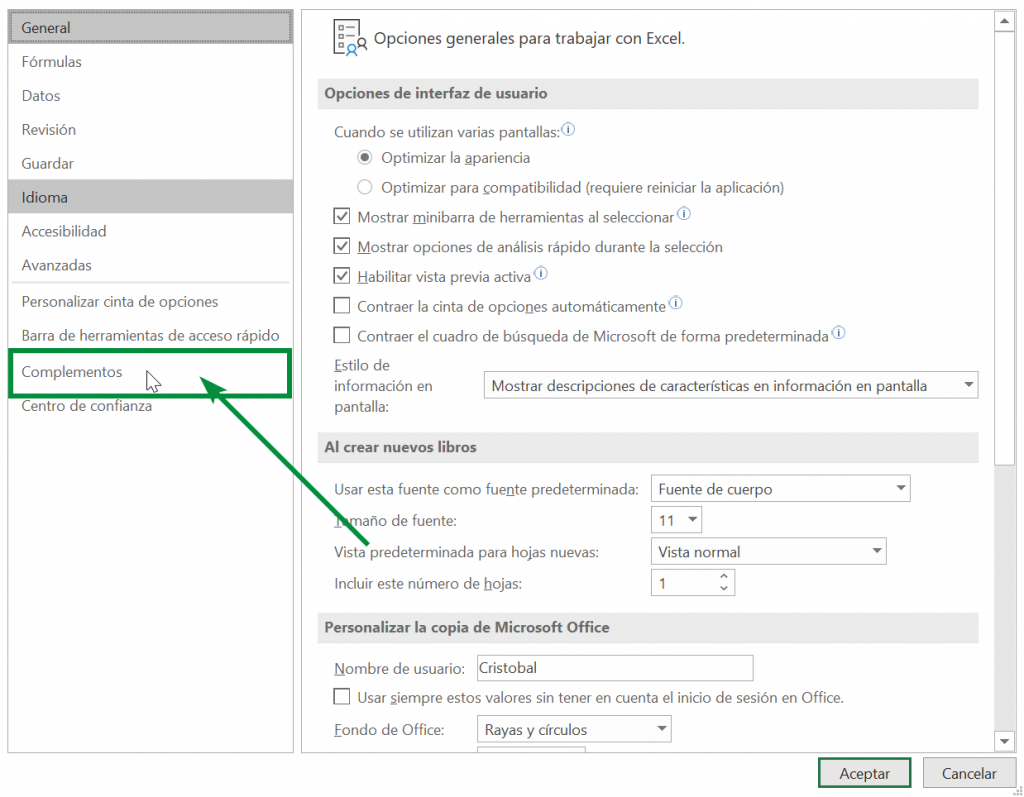 Step 4: In the add-ons window we click on the “Go” box:

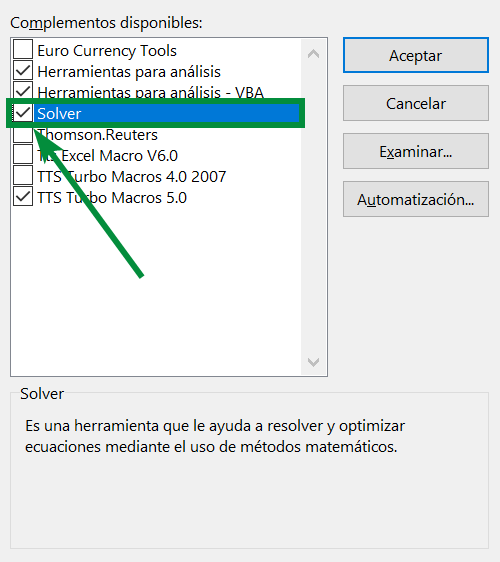
Step 5: A new window will open, in which we must make sure that the “Solver” option has a ticket in the box to its left:
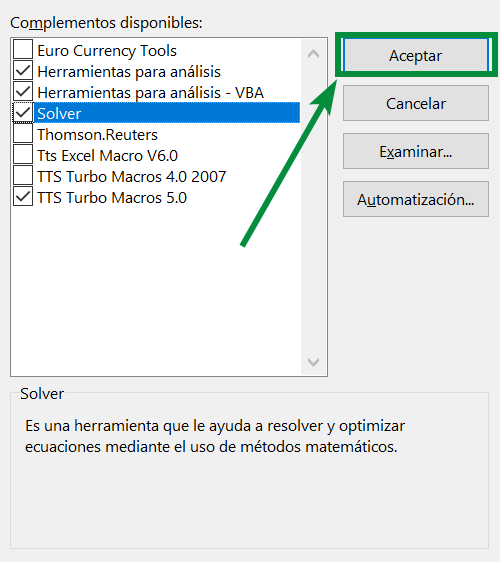
Step 6: In the same window (“Available add-ons”) we click accept:
Step 7: If we carried out all these steps correctly, the SOLVER tool should have appeared in the “Data” tab of the main Excel bar, in the “Analysis” section:

Defining the problem in Excel to optimize with Solver
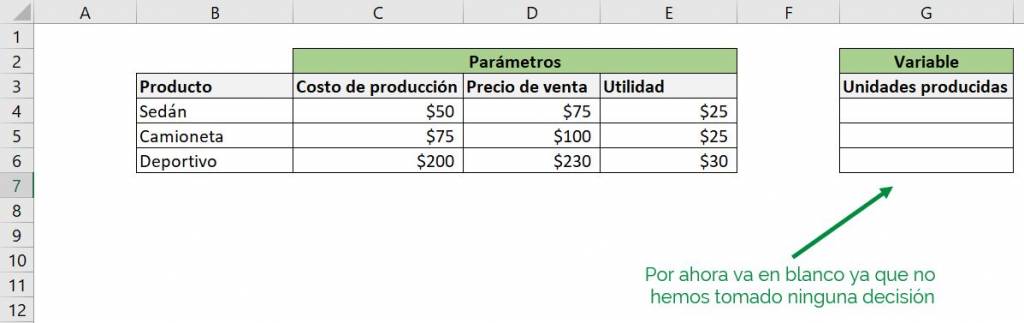
Having activated the Excel Solver tool, all that remains is to learn how to apply it. The first thing to define is what our function is to optimize, which would correspond to the result of our decisions. In the following example we have a company that sells cars:

The decision problem that the company faces in this case is to obtain the greatest possible profit, so in addition to having the profit for each type of car, it is necessary to see how much we are going to produce.
We can see in the image that the company offers three types of cars: sedan, truck and sports car. Each of these types has a production cost and a market sale price, with which we can calculate the profit when selling each one:
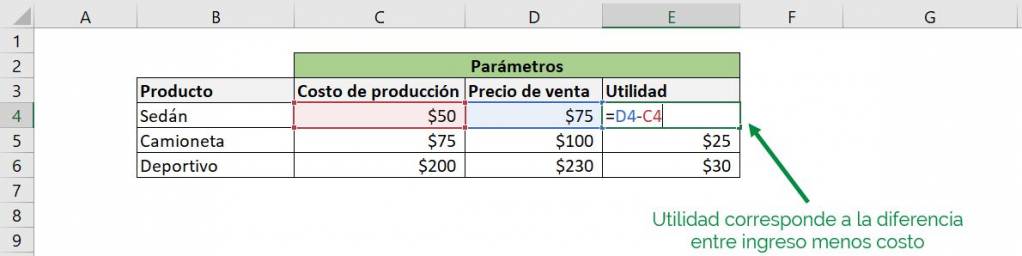
These values correspond to the parameters of our problem in Excel, that is, numbers that for the purposes of our calculations will remain fixed, since in this scenario they do not depend on the decisions we make.
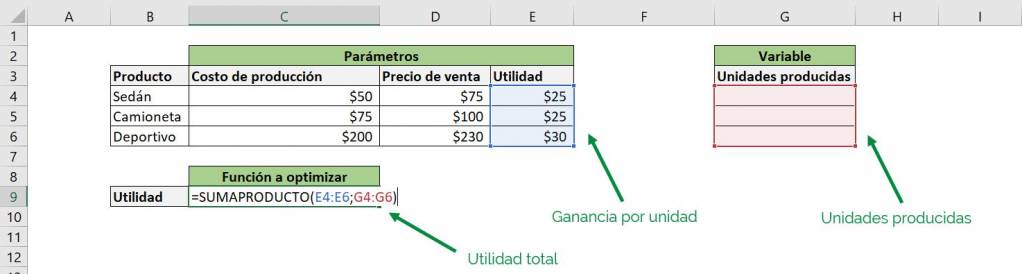
Let's assume that in this case the only decision our company faces is how much to produce of each type of car:
To SOLVE these will be our only problem variables, that is, the only thing that can change to optimize our function.
Ninja Tip: The boxes that contain the variables can be blank or contain a number, but never contain an Excel function, since in that case they cannot be adjusted.
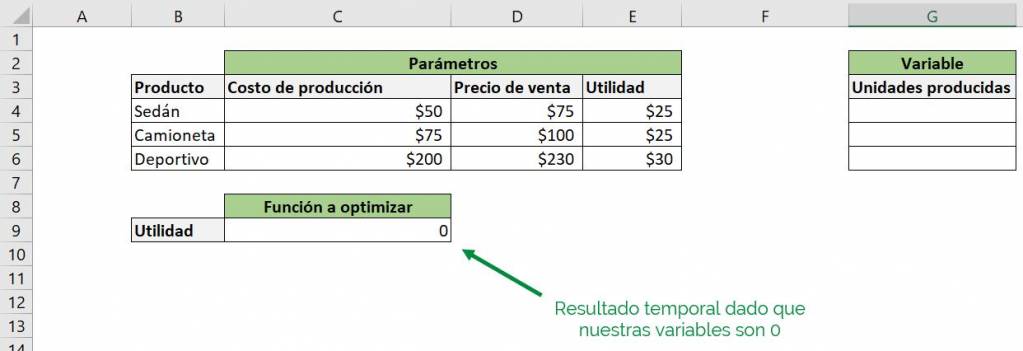
Already having what we earn per unit and the units that we are going to produce, we can create a function that tells the total profit that we are going to have. To simplify this process we will use the function SUMPRODUCT:
For now the result that Excel will return will be 0, because we are not producing any units, however, this will be adjusted when we enter the problem in Solver:
Ninja Tip: You can ensure that the function is correctly entered by putting numbers to the variables and seeing that the changes in the result of the function to be optimized are correct.
This result is going to measure how well our company is doing, so we would like to optimize it, which in this case is to make the profit as large as possible. This means that we want maximize the function.
Given how our decision problem is currently defined, our function has no maximum, since, for example, it could put in a million pickup trucks and there is nothing to prevent it. This is where our constraints matter, as they simulate the different barriers we have in our production.
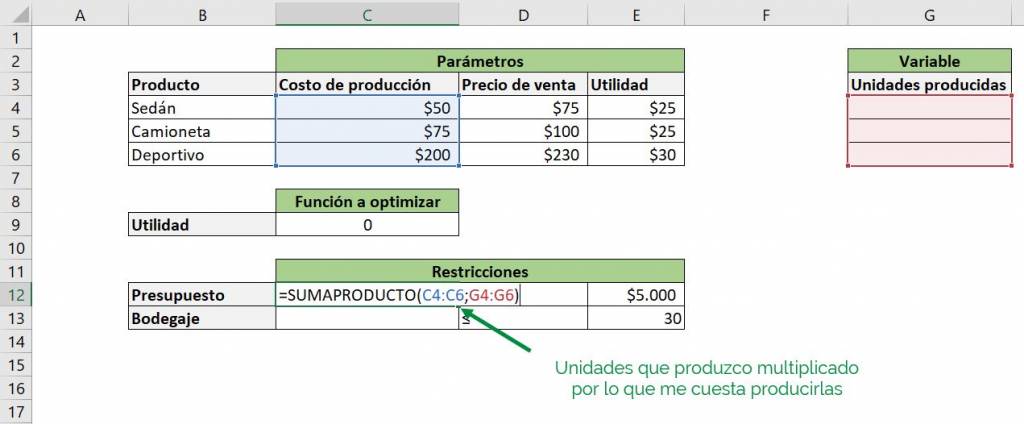
In the case of our car company, let's assume that there are two restrictions: that we have a budget of $5,000 to spend on production and that we can keep a maximum of 30 cars in our warehouse, so we are unable to produce more:
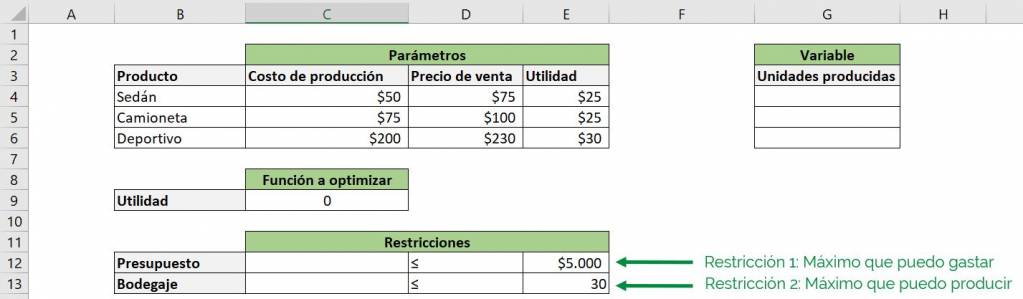
We can see that the right column of the “Restrictions” table shows the maximum resources of each type that we have, given by the parameters $5,000 and 30. Now we need to see the resources that we are currently using.
For the “Budget” constraint we use the SUMPRODUCT function to see how much we are currently spending:
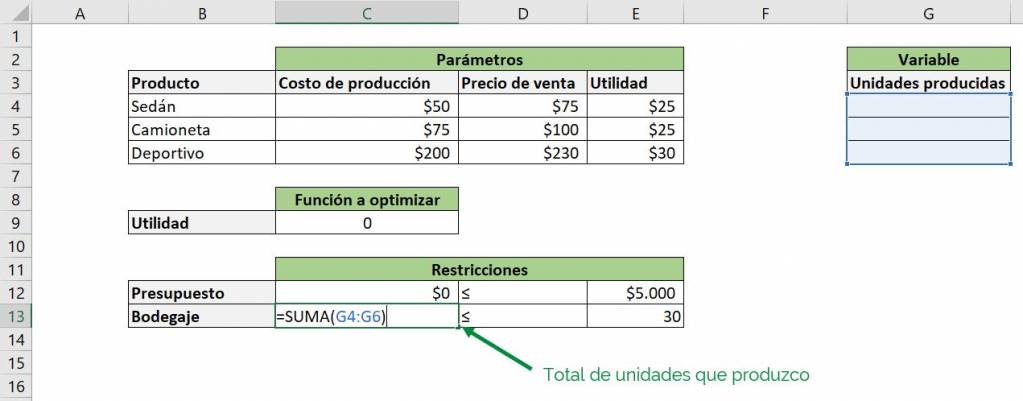
For the storage restriction we use the SUM function to obtain the total number of units produced:
Now we are ready to pass our problem to the Solver tool.
Transferring our decision problem to Solver
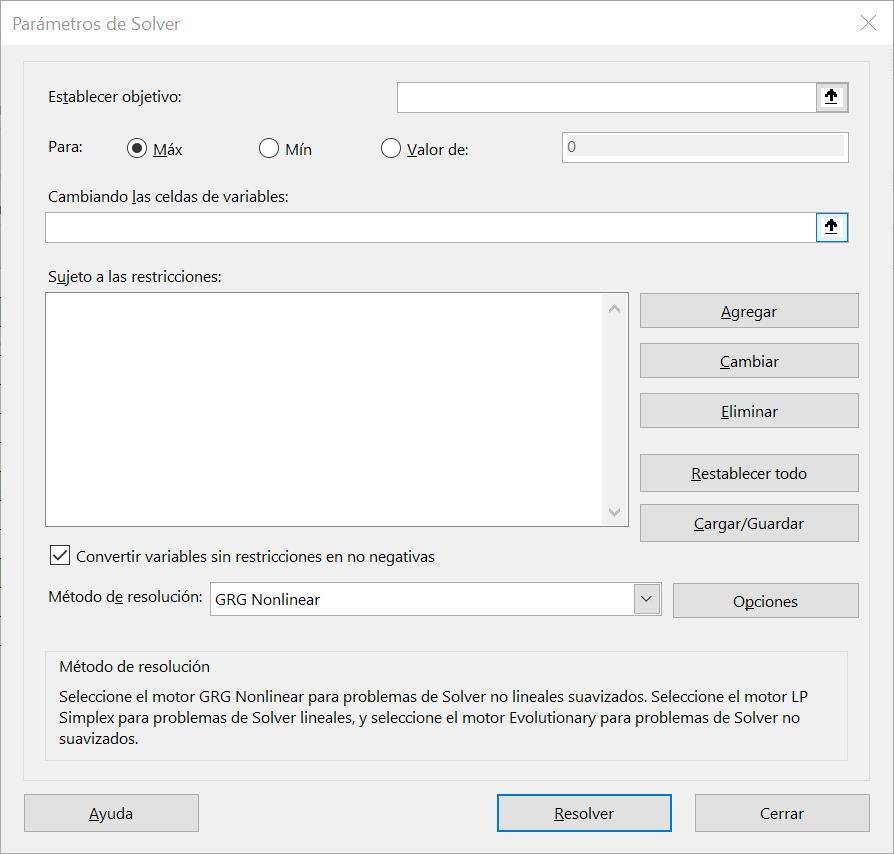
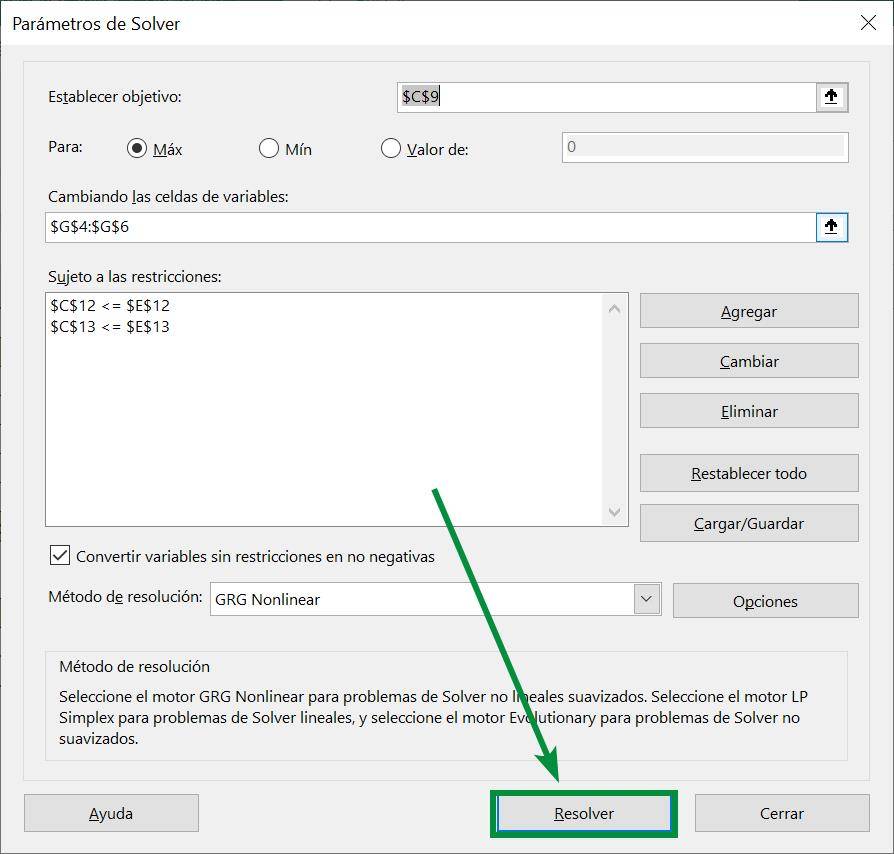
Step 1: To transfer our problem from Excel to Solver we must first open the tool. As we already mentioned, this is located in the “Data” tab of the main Excel bar, in the “Analysis” section. By clicking on the button the following window will open:
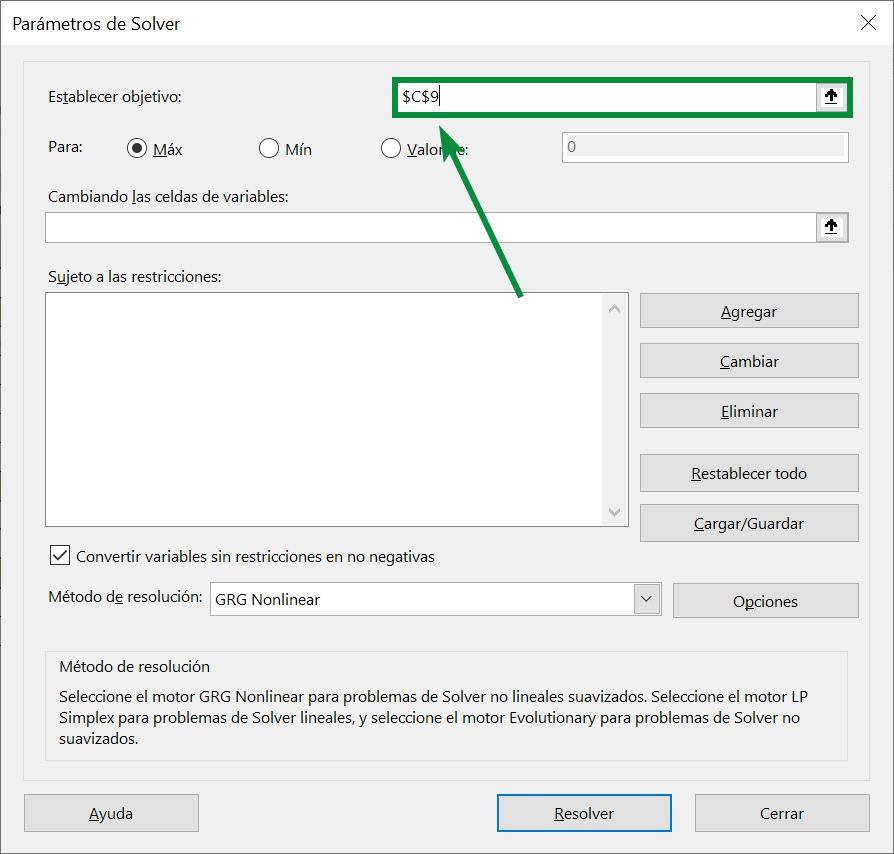
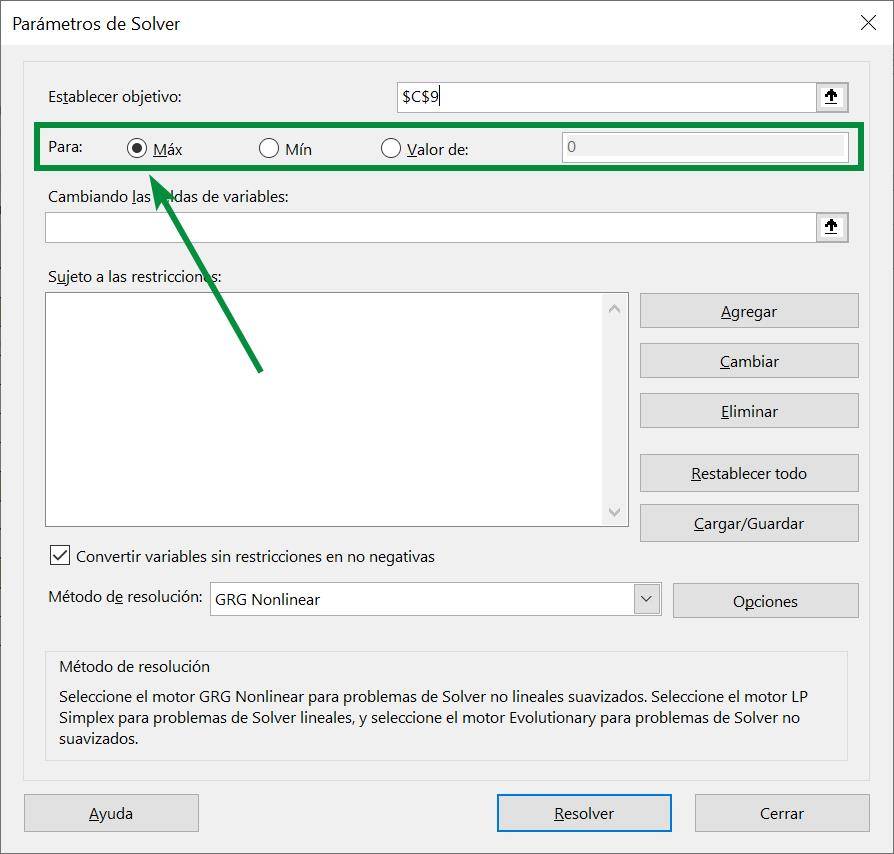
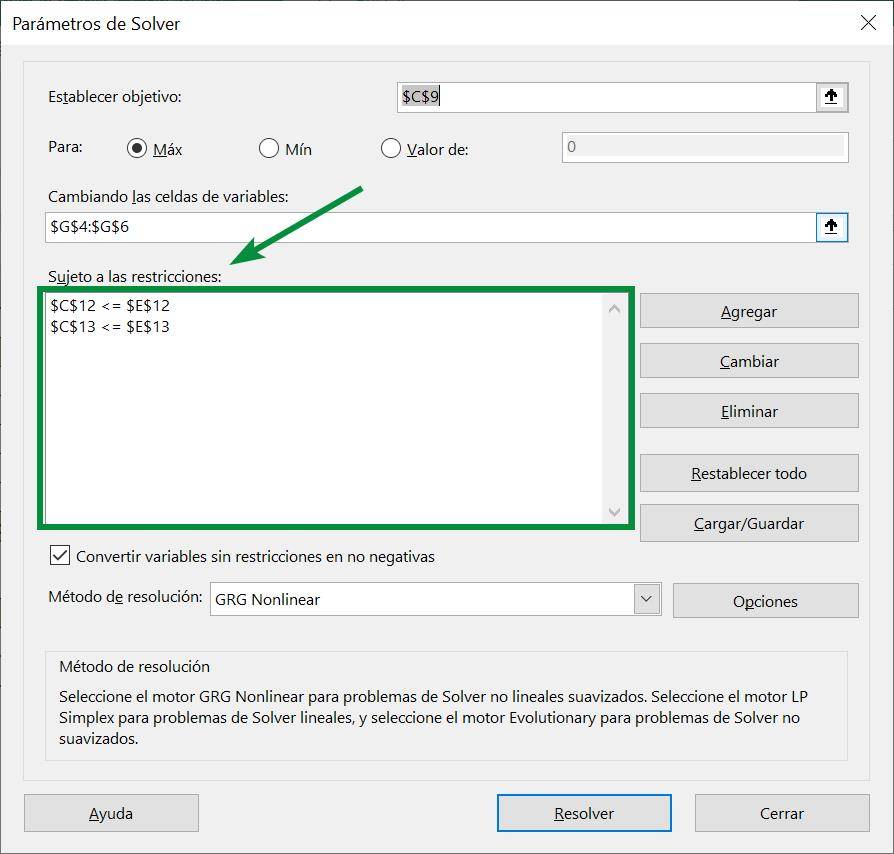
Step 2: The next thing is to indicate our objective, which corresponds to the function we want to optimize. In this case it corresponds to the total utility, so we press the arrow button and indicate to Solver the box C9, which is where our function is located:
Step 3: Now we must make sure that the “To” option has what we are looking for selected. Here we can tell Solver to maximize the function, minimize it, or make it take a certain value. Since we are looking to maximize utility, we make sure the option reads “Max”:
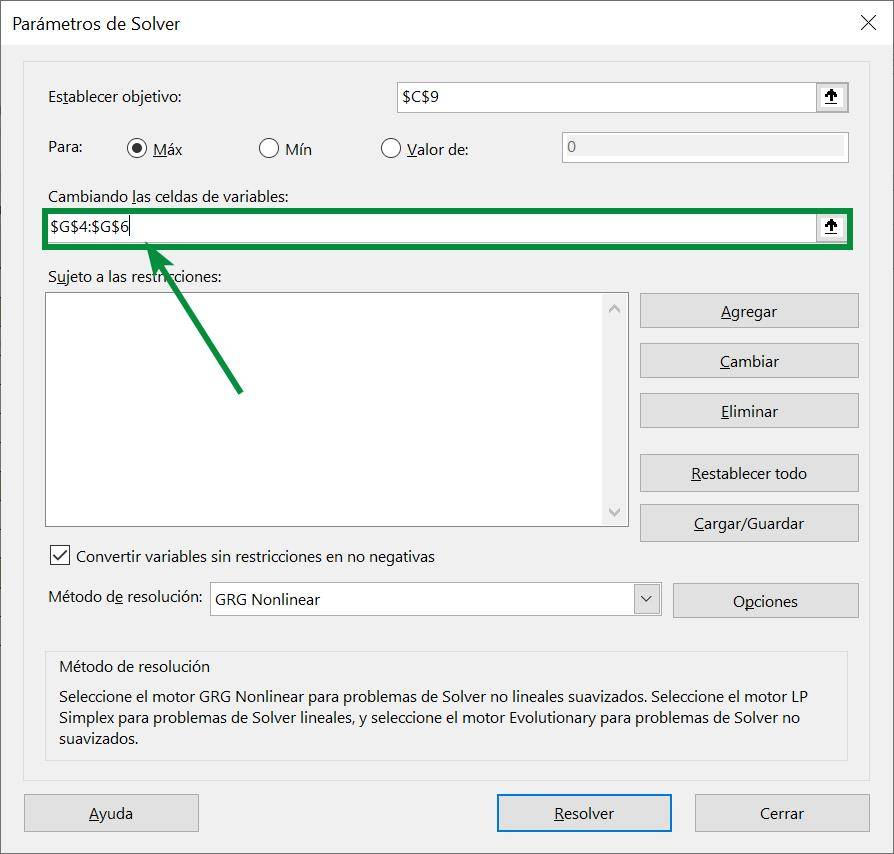
Step 4: The next step is to tell Solver the decision variables. In this case my variables are how much I produce of each type of car, so I indicate to Solver the range G4:G6:
Tip Ninja: When selecting variables I can hold down the “Ctrl” key to select ranges of variables that are separate. I can also write the ranges using a “;” to indicate that they are separated.
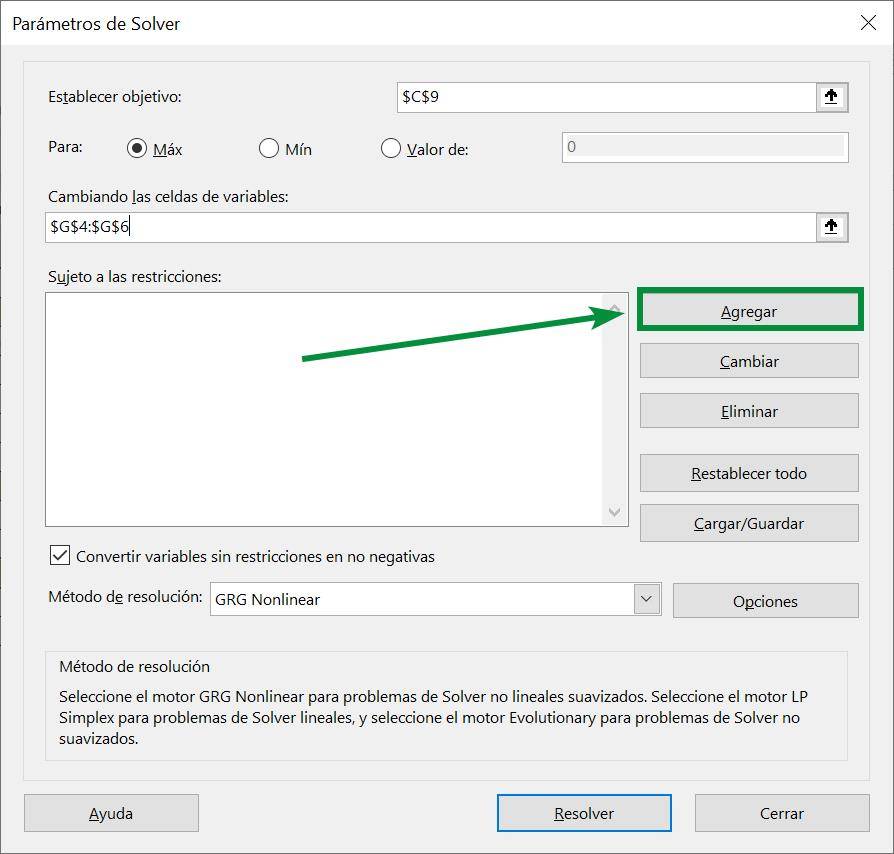
Step 5: It is now time to introduce the restrictions of our problem to Solver. To do this, press the button that says “Add”, which is located to the right of the “Subject to restrictions” box:
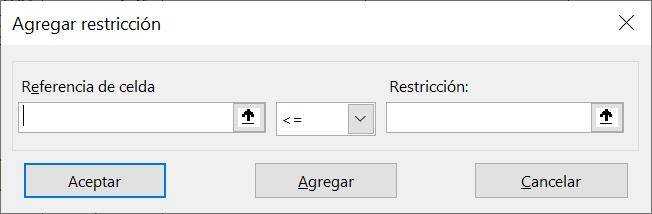
Step 6: Pressing the “Add” button will open a new window called “Add restriction”. In this window we have three elements: a reference to the cell that contains the resources we are currently using, the relationship that cell has with the constraint and a reference to the cell that contains the parameter of our constraint:
Step 7: The first constraint we will introduce into Solver is our limited budget. In this case, cell C12 will go to the left, since it corresponds to the cell that contains the SUMPRODUCT function that describes the resources we are using:
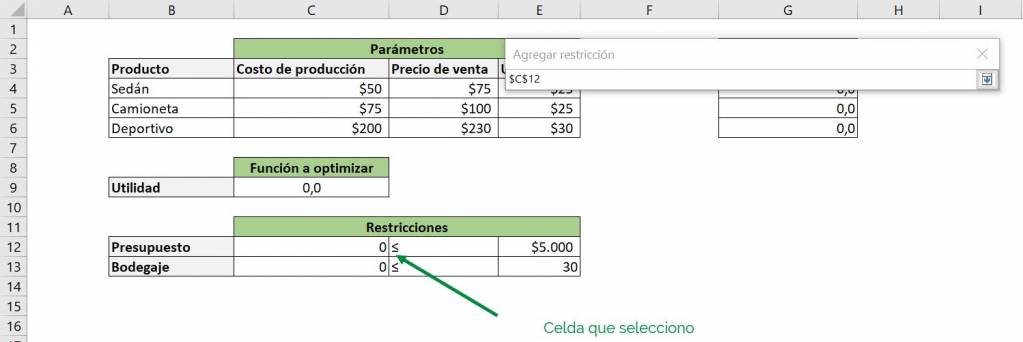
Then on the right we place cell E12, which is the one that contains the parameter $5,000, our maximum budget. Finally we make sure that the relationship between the variables is correct, in this case it is less than or equal:
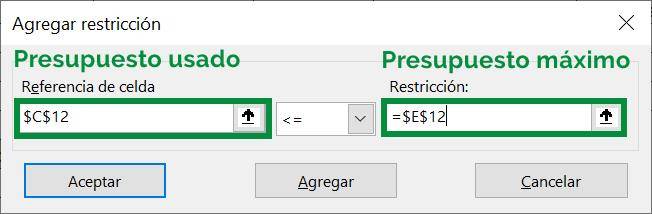
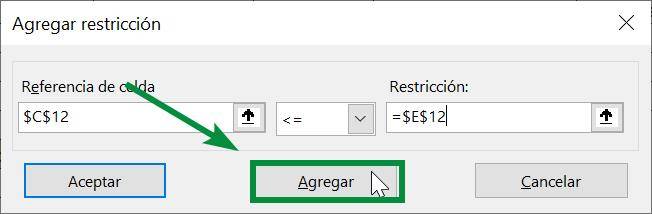
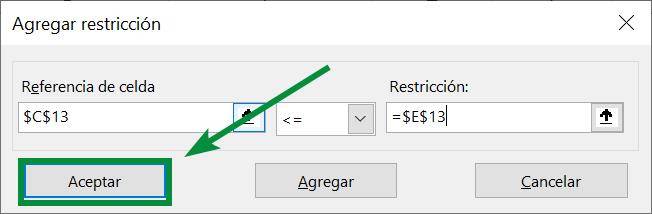
Step 8: Having the constraint ready, we press the “Add” button to enter it in Solver, which will empty the boxes to allow us to enter another constraint:

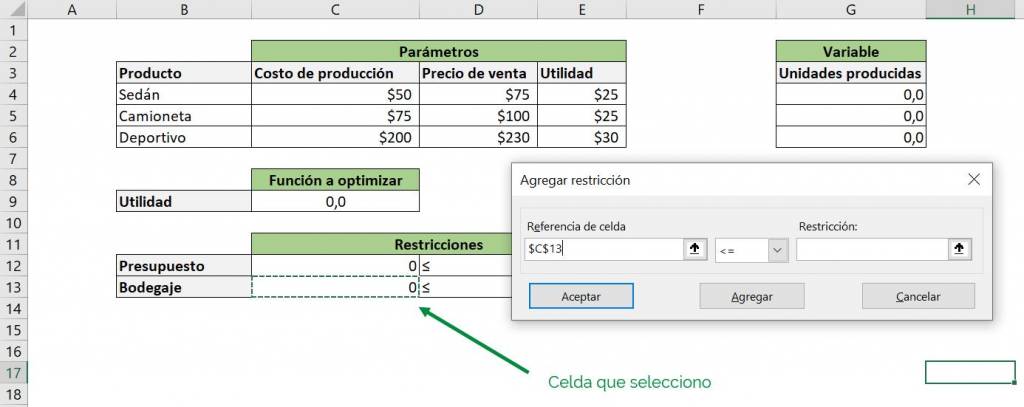
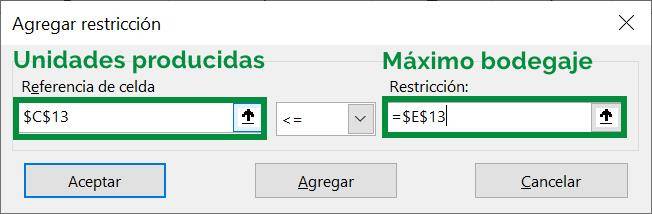
Step 9: Now we do the same with the second restriction, indicating in the right box cell C13, which contains the total number of units produced, and in the left box E13, which contains the maximum that I can store:
Step 10: There are no more restrictions to enter so we click accept, which takes us to the main Solver window:
If the constraints were entered correctly in Solver, they should appear in the white square under “Subject to constraints”:
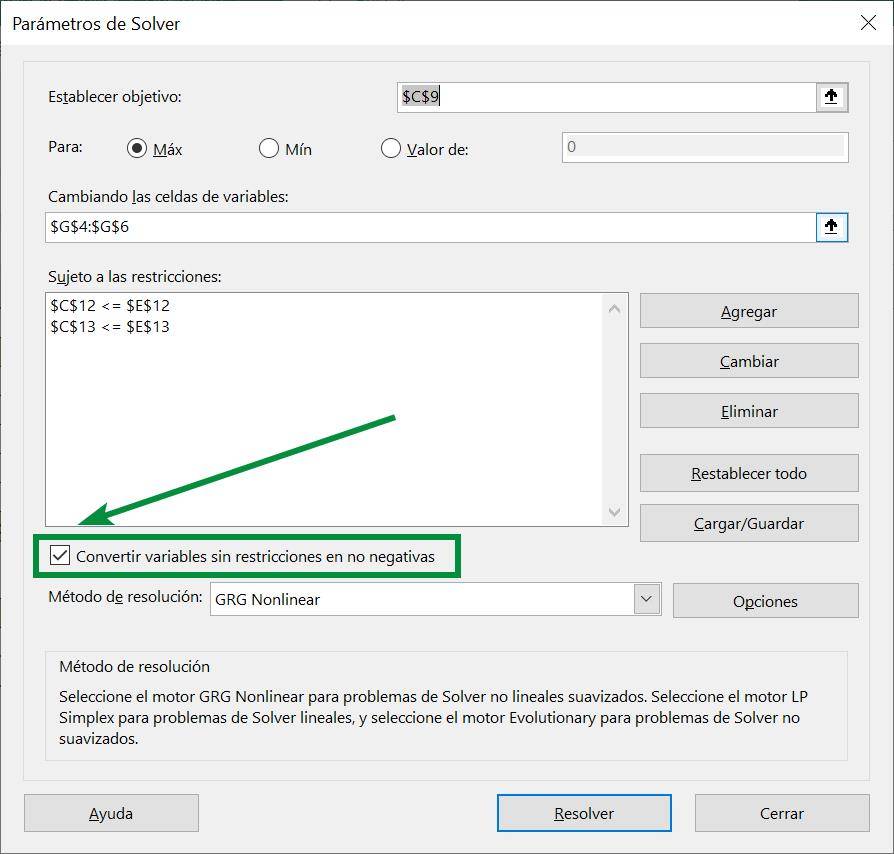
Step 11: Since our variables cannot be negative, we need to make sure the option in Solver is checked:
Step 12: Now we can run Solver, so we press the “Solve” button:
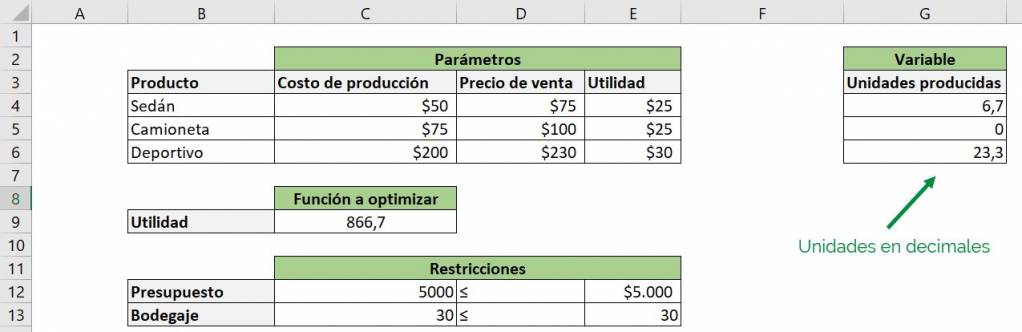
Now returning to the Excel workbook, we see that Solver assigned numbers to our variables, which gives us an optimal result. However, we have a problem because Solver does not know that the variables are autos, so it gives us numbers in decimal:
To solve this we return to the Solver window and add a new constraint, indicating the range where our variables are located and the “int” relationship (the word integer will appear automatically):
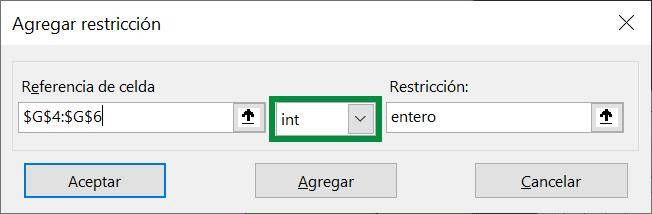
This restricts variables, which are in the range G4:G6, to be integers.
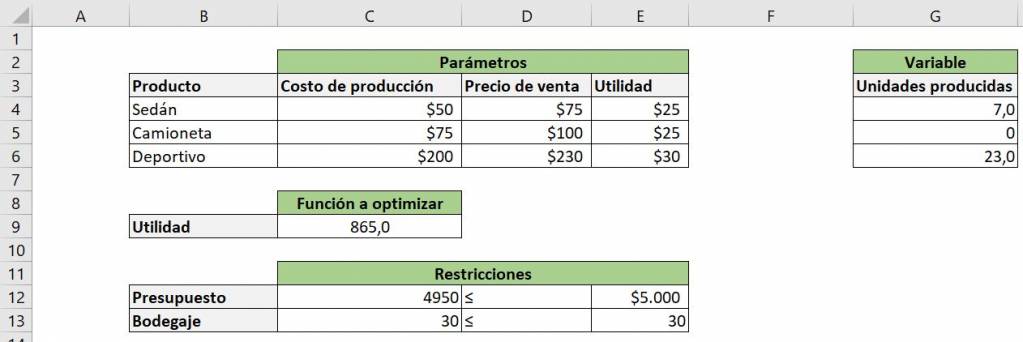
Our optimum is now given by integers:
Ninja Tip: The Solver tool does not update automatically like a traditional Excel function, so every time we make changes to constraints or parameters we must run it again to obtain a new optimum.
Frequent questions
Use Solver to find an optimal value (minimum or maximum) for a formula in a cell, the target cell, that is subject to constraints or limitations on the values of other formula cells in a worksheet. Solver works with a group of cells called decision variable cells, or simply variable cells that are used to calculate formulas in the target and constraint cells.
The Solver add-in is a Microsoft Office Excel add-in program that is available when you install Microsoft Office or Excel.

Christopher Diaz
Commercial engineer and Master in Finance from the Pontifical Catholic University. Special interest in topics related to corporate finance, private equity and real estate investment.